S100 Computers

HomeS-100 Boards HistoryNew BoardsSoftwareBoards For Sale
ForumOther Web Sites NewsIndex  

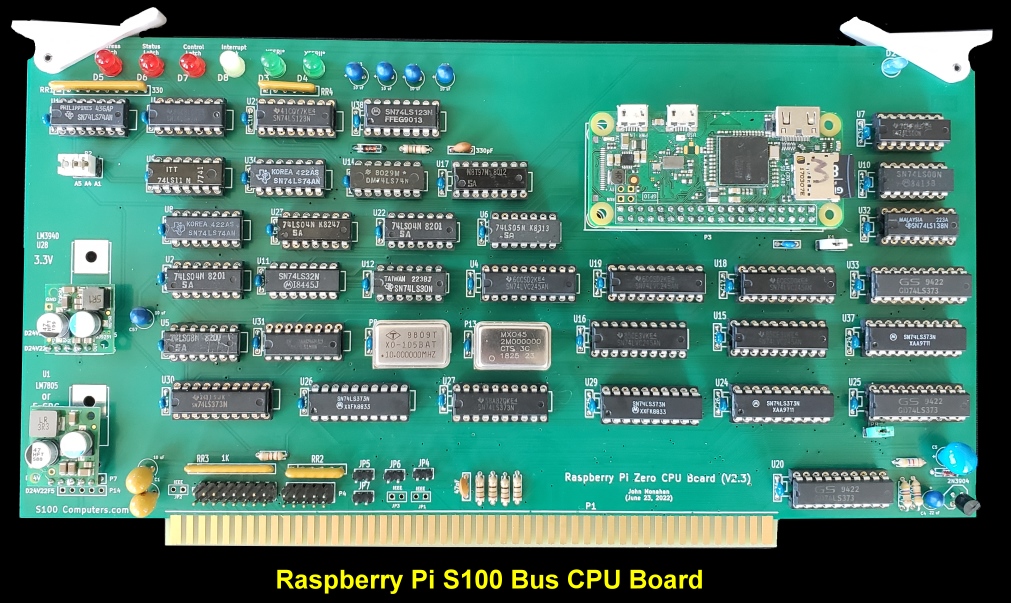
The Raspberry Pi Zero S100 Bus CPU Board.
  
  Raspberry Pi CPU Board

There are at least three series of Raspberry Pi Boards. Several generations of each have now been released. Raspberry Pi SBCs feature a Broadcom system on a chip (SoC) with an integrated ARM-compatible central processing unit (CPU) and on-chip graphics processing unit (GPU).

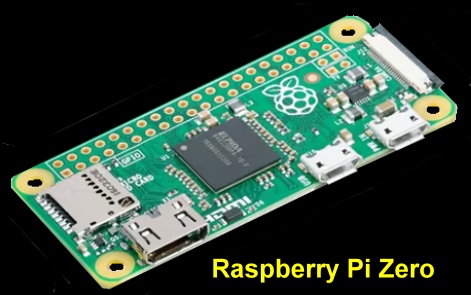
The Raspberry Pi Zero with a smaller size than the earlier units has a reduced input/output (I/O) and general-purpose input/output (GPIO) capabilities.  It was released in November 2015 for $5. On 28 February 2017, the Raspberry Pi Zero W was launched, a version of the Zero with Wi-Fi and Bluetooth capabilities, for $10.  On 28 October 2021, the Raspberry Pi Zero 2 W was launched, a version of the Zero W with a system in a package (SiP) designed by Raspberry Pi and based on the Raspberry Pi 3.  In contrast to the older ones, the Pi 2 W is 64 bit capable. The price was around $15. 

However in my hands I could only get the Pi Zero to work reliably on this board.  The 2W version not only ran slower but had interface errors with the S100 bus. 
     Raspberry Pi Zero
    
Based on the success and popularity of the Edison CPI board I decided to do an equivalent Raspberry Pi Zero board.  In both cases, because of the speed of their CPUs, one can program all the S100 Bus signals with a C++ compiler.  In fact the basic C code for the Edison Boards was just lifted and modified for this Raspberry Pi Zero board.  It might be a good idea to go back and look at the Edison and Edison II first.

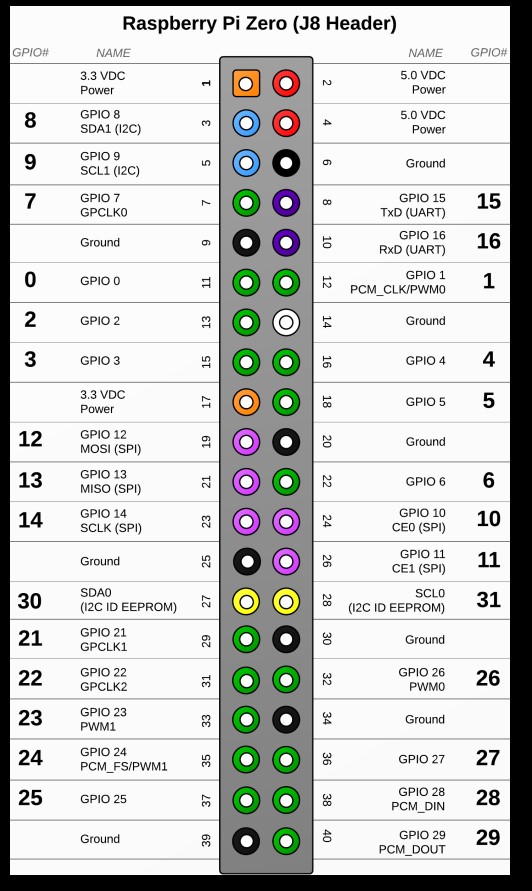
There is one complication however, the Raspberry Pi board has far fewer GPIO pins than the Edison units. Here is the pinout:
   
   Raspberry Pi Zero 2W Pinout
This is in contrast to the 70 pins the Edison Board had.  The only way around this issue is to multiplex and latch the Raspberry Pi GPIO pins.  Fortunately with this the Raspberry Pi is still fast enough to have a functional S100 bus.

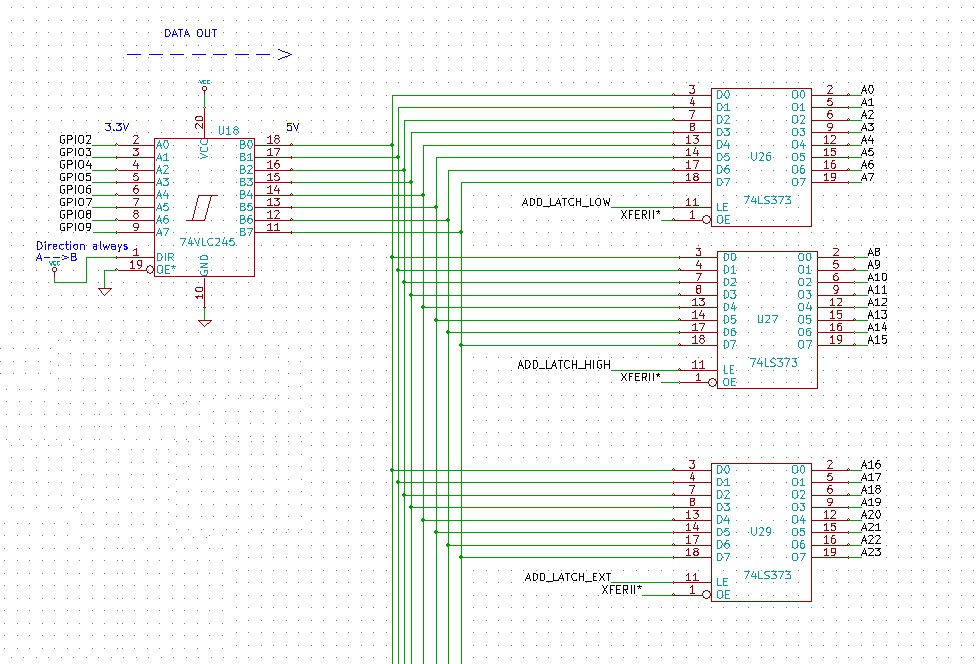
Let me illustrate this with the S100 bus address lines.  For the IEEE-696 standard the are 24 address lines to access up to 24MG of RAM.  We will set aside 8 Raspberry GPIO bins (
GPIO2-GPIO9) for address line addressing. We will use another 3 GPIO pins to latch in these 8 lines to 3 separate 74LS373s that go to the 24 address lines.
    
    Addresss Line latch

The Address Line latches themselves are controlled by the following circuit:-
   
  Address Lines latch 2

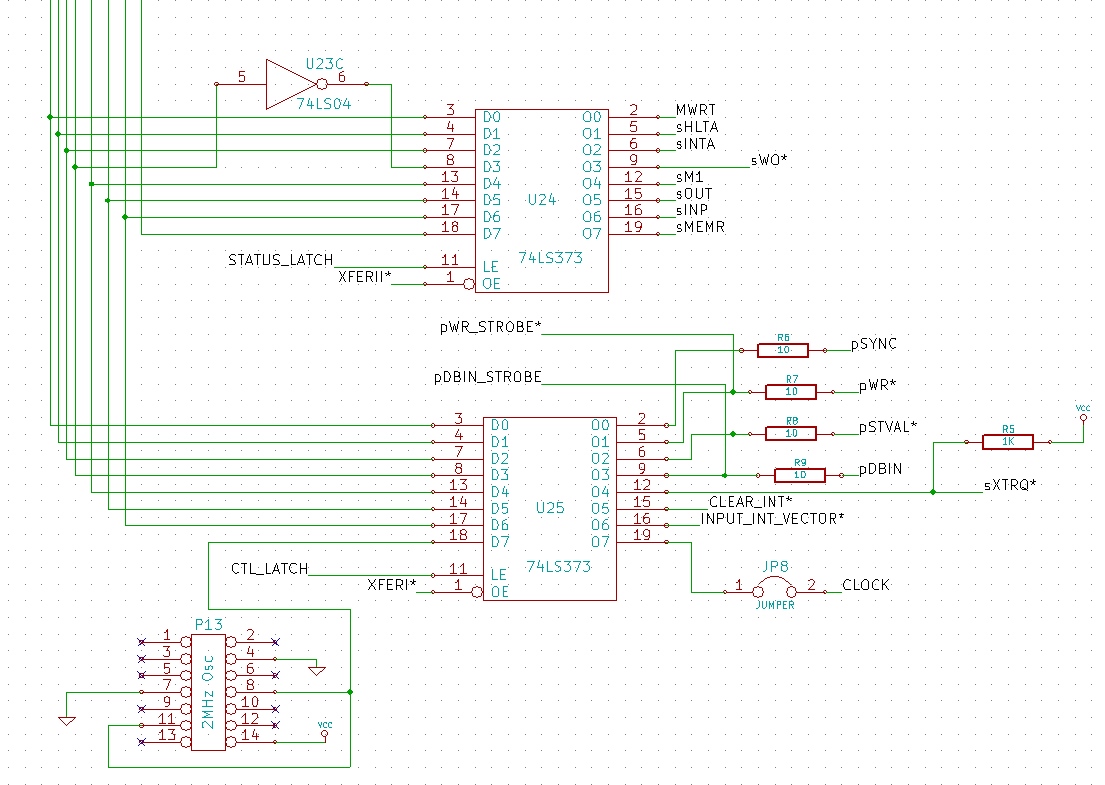
Likewise the S100 bus Status and Control lines are controlled by the same 8 multiplexed/latched lines:
  
  Status Lines latch 

All this seems like a lot of over-head to be programmed, but because of the 1 GHz clock speed in the 64/32 bit ARM Cortex Pi,  there is no difficulty doing S100 bus speeds.  The above
74LVC245s also serve the purpose of interfacing the Pi 3.3V GPIO pins to the 5V pins of the S100 bus.

Getting data in and out of the Pi CPU to/from the S100 bus is best done with 8 dedicated Pi GPIO lines (
GPIO16-GPIO23).
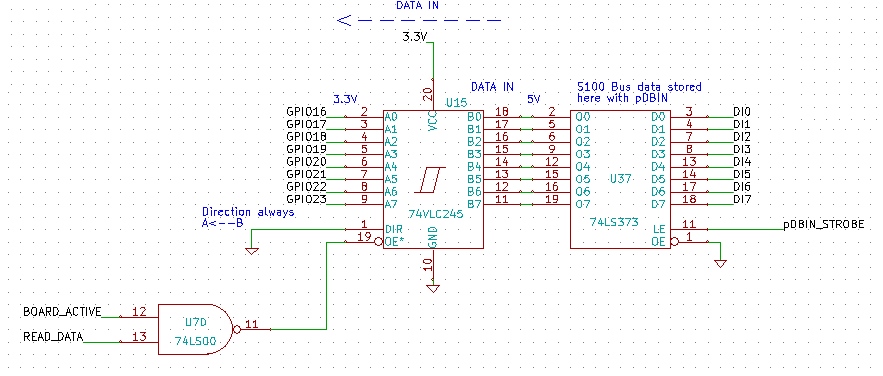
Here is the circuit to read data from the S100 bus:
    
  Data In Circuit
   
Again we have 5V to 3.3V voltage levels conversion. The S100 bus
pDBIN signal latches the data into U37. Later in its own good time,  the Pi reads it with the Read Data signal.    It's important to remember here we are generating all the S100 bus signals.  The Raspberry Pi is a temporary Bus Master (see below). Nothing happens on the bus unless the Pi says so.  The is no need for wait states for example.  I have not tried this circuit/approach with old S100 bus DRAM boards.  I suspect an alternative circuit/software may be required for DRAM boards,  but it's fine with many static RAM boards I have tried Godbout boards -- they are fine. .

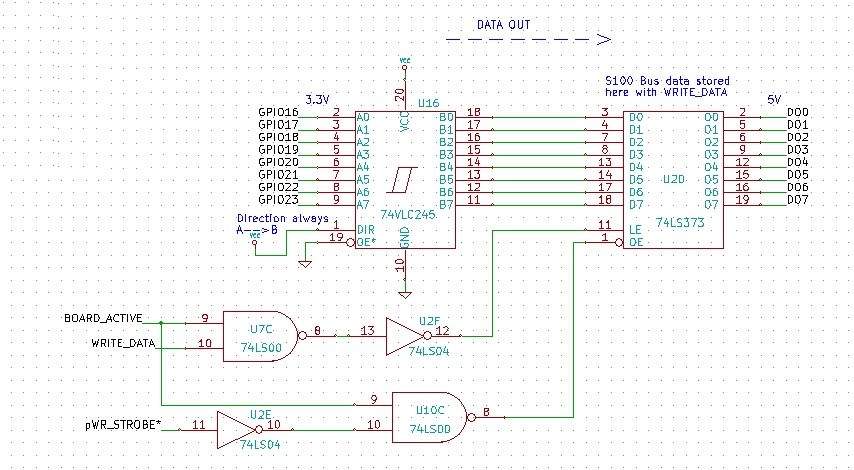
Here is the circuit to write data to the S100 bus: 
       
  Data OutCircuit
  
First we have 5V to 3.3V voltage levels conversion.  We latch data into U20 with the Pi
WRITE_DATA signal.  When,  it is ready to be read by the S100 bus the S100 bus pWR*  will expose it from the U20 74LS373. 

Its very important to realize that for the above I/O, data to/from the Pi is latched and stable while the Pi CPU is later going on to generate the S100 bus signals themselves.

The Raspberry Pi Zero CPU Board as an S100 Bus Slave.
While we could configure this CPU board as a S100 bus master it is best to set it up as a bus slave.  We simply transfer control over to it from a Z80 CPU board.  Also because there is plenty of room on the board we will do this in hardware using only
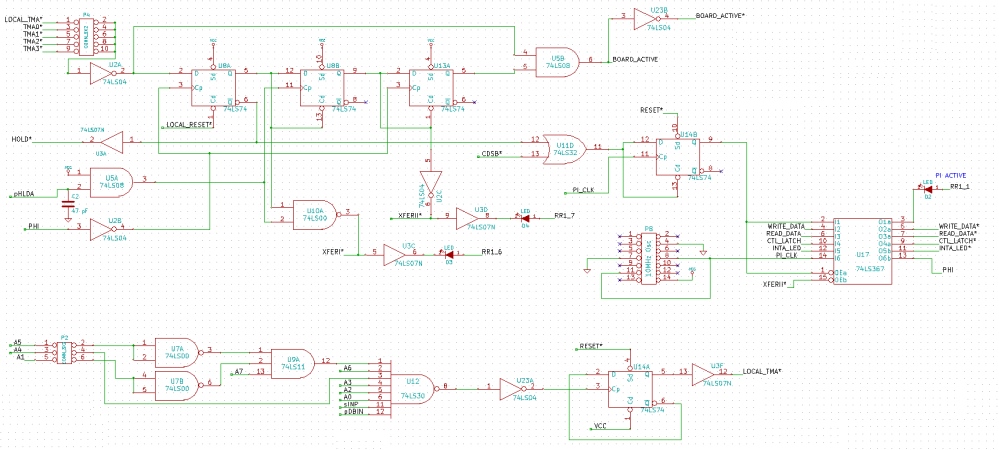
74LSxx chips rather than a GAL or CPLD.   We will use the tried and true circuit from our 8086 CPU board shown here:-
 
    Master Slave Circuit

As per IEEE-696,  pulling any one of the S100 bus
TMA lines low should transfer bus control over to the Pi.  I have added a simple circuit to do this locally on the board as well.
Inputting from port
0DDH will trigger the board to take over the S100 bus.
Once
BOARD_ACTIVE goes high then the Raspberry Pi then controls ALL S100 bus signals.


Running Raspberry Linux  Software.
A number of operating systems now exist to run Raspberry Pi Boards.   For the Pi Zero the most popular by far is the 32 bit Debian Linux Operating system.  
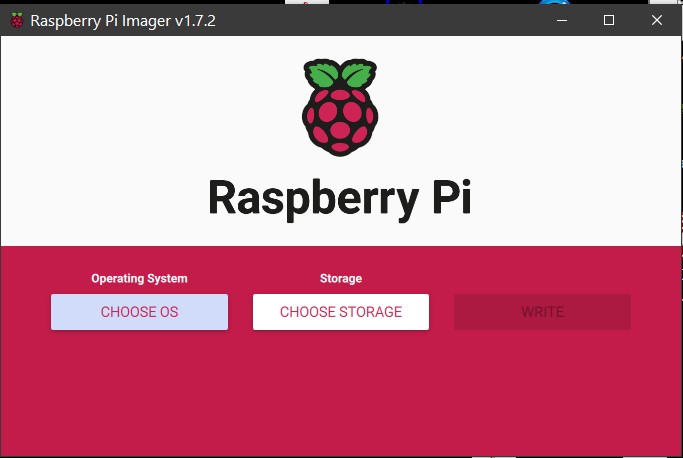
It can be downloaded from the Raspberry Web site
   
  Linux Download
   
The above imager presents a number of alternative options.  Do not use the 64 bit version with the Pi Zero. 
It saves time later to configure the download in the above Pi Imager program.
 
     Imager Setup
 
Now the are two ways here you can setup and configure Linux for your Raspberry Pi on a bootable SD card.. 
You can download it from the Raspberry Pi web site, configure it and load up some libraries supplied below or you can simply make an Linux image on an SD card using the HDD Raw Copy Tool (as we have done for SD and CF CPM card images).
While some day I would like to have a Raspberry Pi "bare metal" OS to interface with the S100 bus, the current Linux approach works fine. 
In 30 seconds you should get the following signon on your HDMI monitor.
   
    Linux Signon   S100 Signon

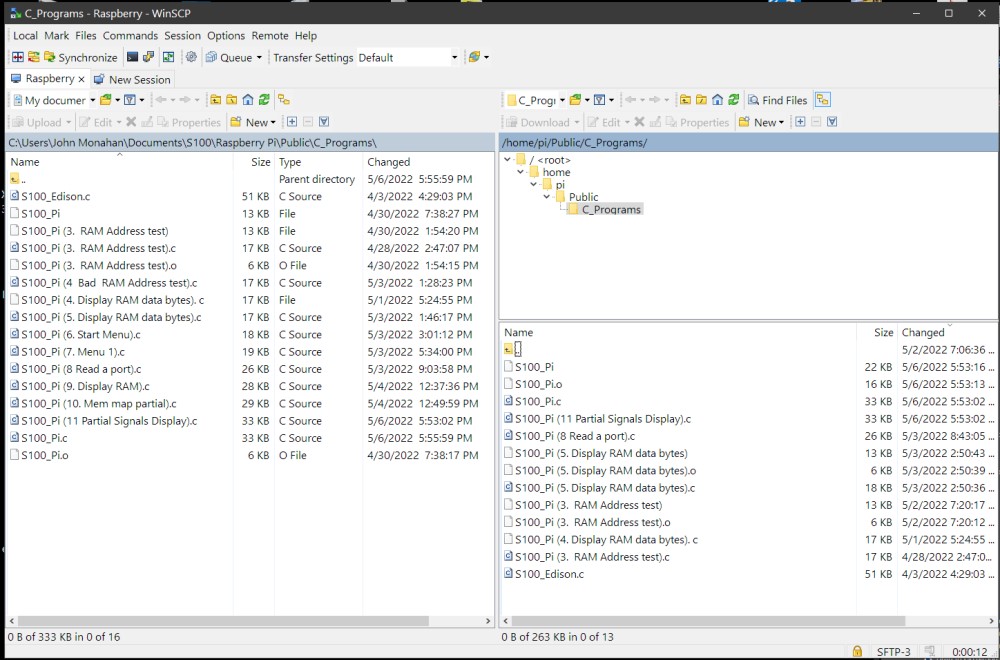
While you can edit and compile all your programs on the Raspberry Pi terminal it is usually more convenient to write everything on a Windows desktop (e.g. Visual C Studio) and simply transfer the C text file to the Raspberry Pi
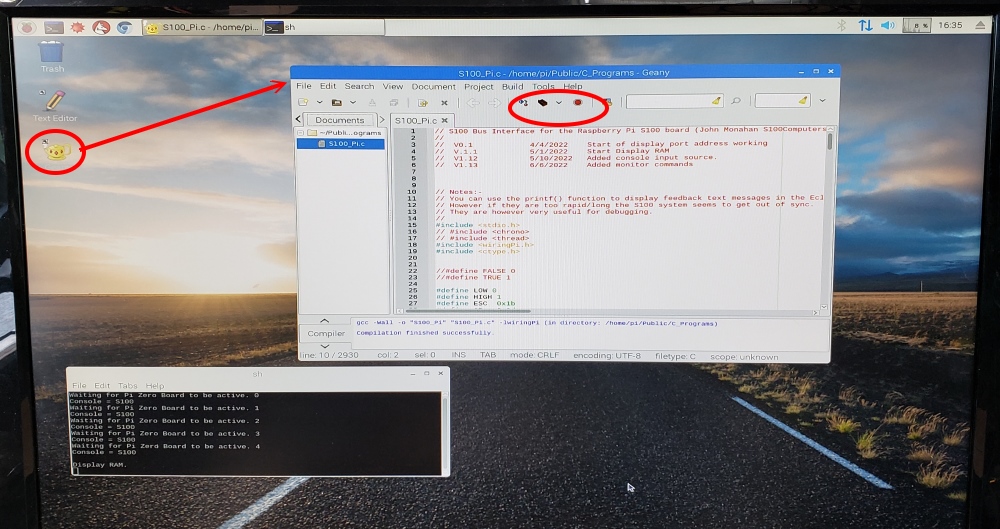
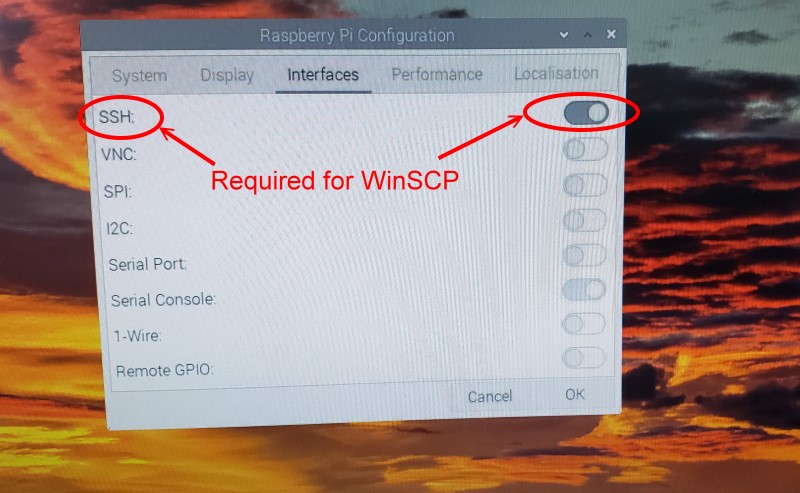
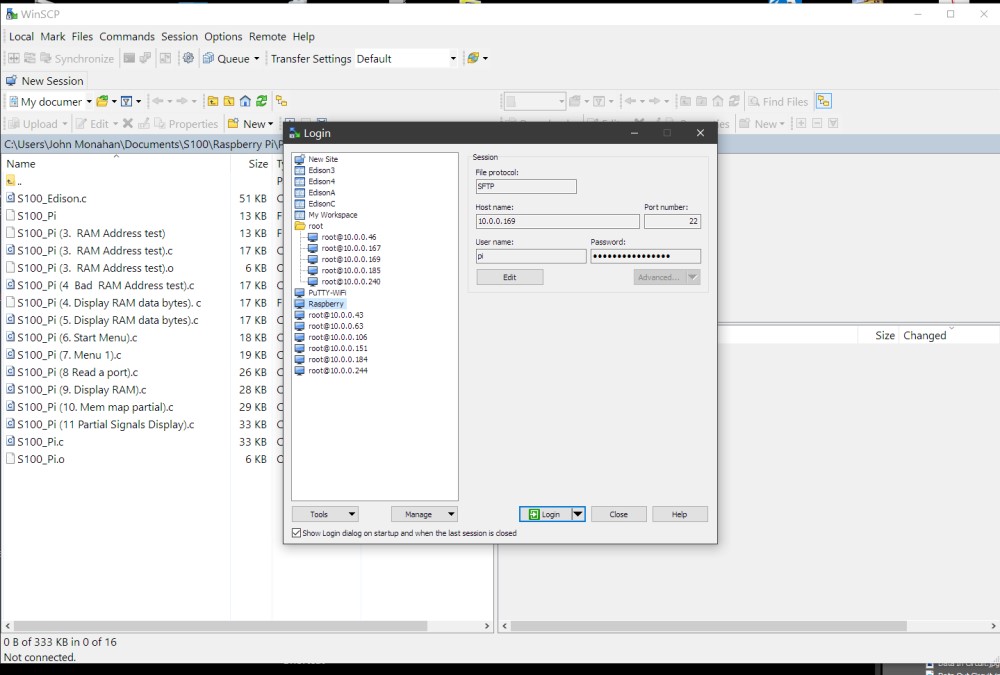
Geany program to compile and run it.  In order to do this you need to use the WinSCP program and in the Linux Configuration setting,  you may need to active SSH (if you did not do so as shown above). BTW while there,  you should also inactivate the display timeout blanking.
   
    Activare SSH
   
     SCP1
   
  SCP2
 
With
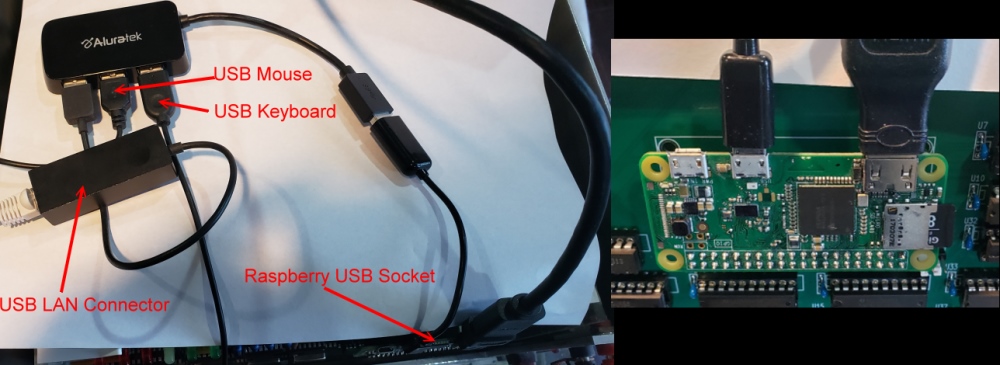
WinSCP you can quickly move files back and forth between computers. I use a USB mouse, keyboard and LAN network adaptor.  
BTW , there is no need to plug in a USB power adaptor to the Raspberry unit. It gets its power from the board (P3,  pins 2 & 4).

The
Geany C IDE interface automatically detects if the C code was updated, so a re-load is just one click away.

There is one further important item you need to take care of.  We need to be able to let the C compiler know the Raspberry Pi GPIO pin names we are using.
You need to download a C library called
WiringPi to do this.  WiringPi is described here.
Some versions of the Linux OS come with
WiringPi included.  Currently the 32 bit Debian Raspberry Pi Linux, does not.
You can check if your OS has it installed with the Console CMD:-

$ gpio -v

If you do not have GIT installed, then under any of the Debian releases (e.g. Raspbian), you can install it with:

$ sudo apt-get install git-core
$ git clone https://github.com/WiringPi/WiringPi.git
$ cd WiringPi
$ ./build

Again use
gpio -v to check the library is installed correctly.


An immediately bootable SD Card
All the above is fairly straightforward to Linux users. However to simplify things I have put together a SD card image that you can directly write to a SD card so your system boots the Raspberry Linux OS with all the above configurations already set.  With that image everything is already setup and configured for you.  It's an older version of Linux that actually seems to boot and run faster than later versions.
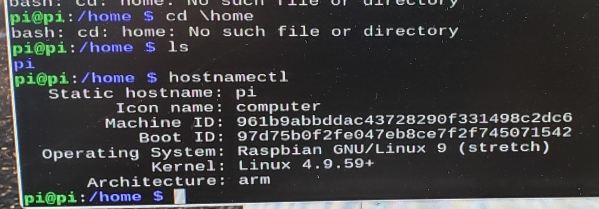
BTW, you can get your Linux version as shown here.
  
     Linux version
 
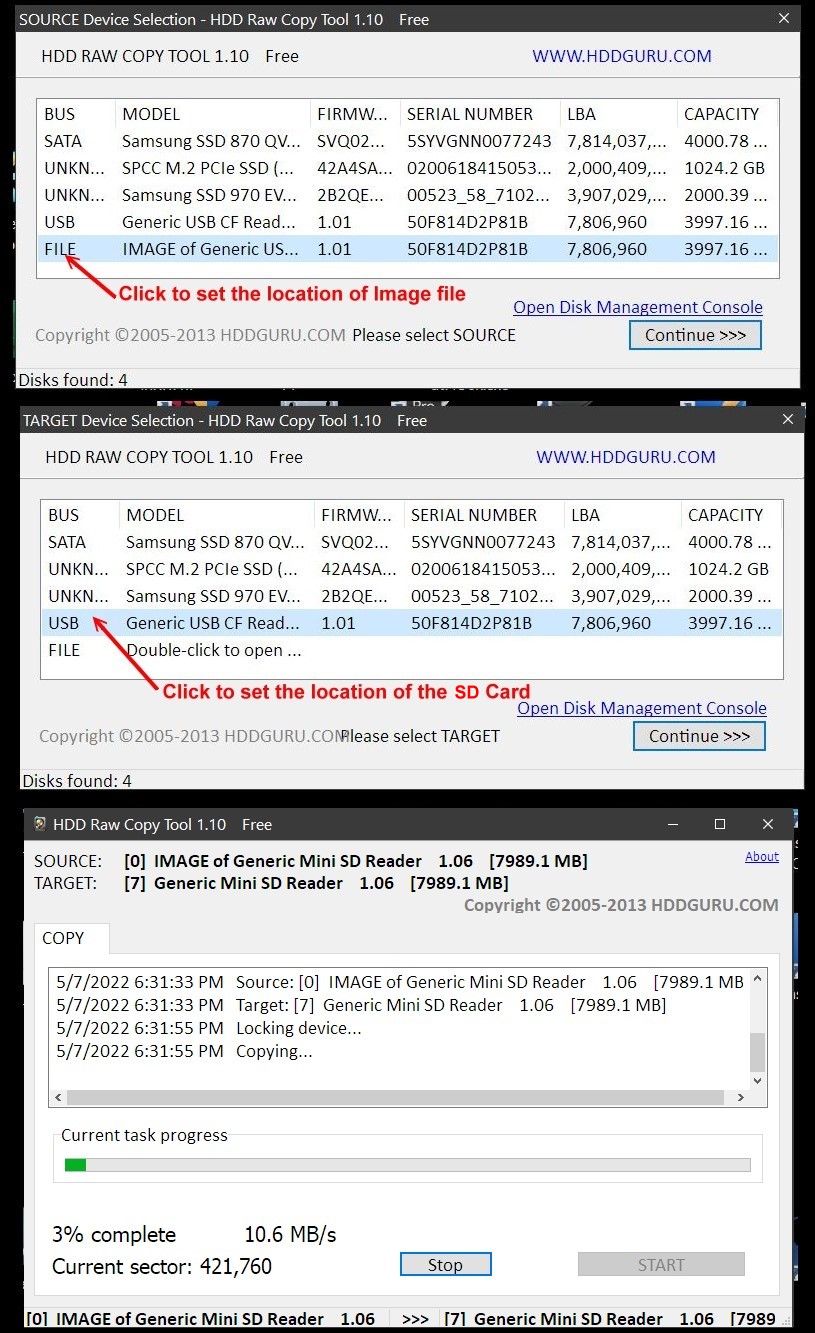
We will use the program called HDD Raw Copy Tool that we used in the past to make a fully functional Raspberry Pi Zero 'disk' from a file that resides on your PC.  The program can be found here.  It can also be found at the bottom of this page. Because we make actual sector by sector SD card copies the file is quite large (typically 6-7MB).  Typically I use 8GB SD Cards.   I found that  HDD Raw Copy Tool does not copy reliably with older small size CF cards.  Likewise the new high capacity cards caused me some problems.  If possible use Kingston or Verbatim 8GB SD cards.

Here is a picture of HHD Raw Copy being used to unpack the Raspberry Pi SD card #2.imgc on to an SD card. 
     SD card Copy
  

Geany -- Running the Raspberry Pi IDE Development Software.
These days we use a self-contained "IDE" interface to write, edit, compile and run a C program.  In the past I used Microsoft's Visual C. Raspberry supplies an equivalent IDE program for the Pi called
Geany
Once configured, it allows you to build a program on your PC, download it to the Pi via your network connection (using WinSCP) and run it remotely from your PC.  You quickly become spoiled with how easy the process is. 

If you are not using my SD card Raspberry Pi OS download version described above, however you will need to configure the
Geany interface to the correct file paths.
I place all my programs in:-

/home/pi/Public/C_Programs
          
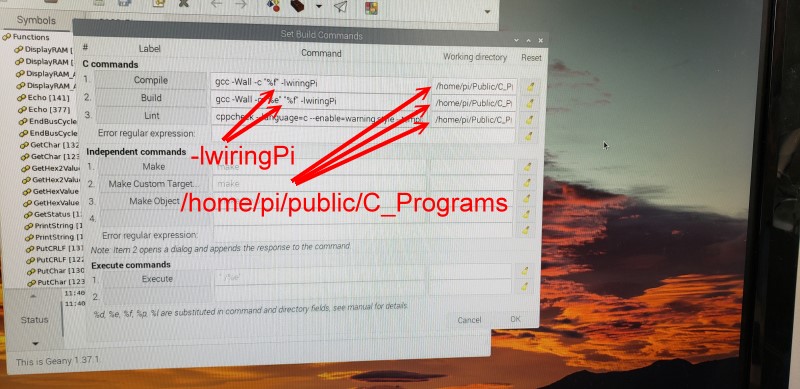
You need to point Geany to this path as well as to the
WiringPi Library.

      Geany Config
    
  
It is within this interface you will do all your Raspberry Pi software development to control the S100 bus. While the C code is quite verbose, because the  Pi CPU is so fast and powerful it has no problem communicating and keeping up with the S100 bus signals.  I supply below, (in C code), an "Pi Z80 Monitor" example. The Pi board acts at a speed of about a 1 MHz Z80 in the S100 bus.


Step By Step Building the Raspberry Pi Board
The build instructions are fairly simple for this board but because it is a complex board building it should not be rushed.  As always, first examine the bare board carefully for scratches or damaged traces, use a magnifying glass if need be.  A broken trace is almost impossible to detect by eye on a completed board.

The board has a fairly simple layout with most of the parts standard
74LSxx parts. Unlike many other boards here you can add all chips at once (see below).
   
Solder in all the required IC sockets, resistors, resistor arrays, capacitors, jumpers, and the 5V and 3.3V voltage regulators.  Be sure you put the resistor arrays in with the correct orientation of pin 1. Check their values before soldering (they are difficult to remove).  Insert all jumper arrays.
  
For prototype boards I generally use "double swipe" IC sockets. For a critical board like this I prefer to use "Machine Tooled" IC sockets.  However they are more expensive and you have to be particularly careful not to bend the IC pins.  The two clock oscillators can have their own special sockets (e.g. Jameco #133006) but actually I find the "Machine Tooled" IC sockets make a better connection.  I in fact solder the 2MHz oscillator (P7) directly to the board since it will never be changed.
 
Place the board in the bus. Check the voltage to sockets on the board is about 5V and 3.3V by placing the board in your S-100 system using an extender board. With no load you will typically get 5.00V  (+/- 0.2V).  BTW, your system should boot and run correctly with its Z80 master CPU board. If not, you have a serious solder bridge somewhere on the board.  Before you do anything else with a magnifying glass go over every socket on the board and examine for proper solder joints. I like to "reheat" each joint just to be on the safe side. The silk screen/varnish on these boards us quite thick. It's easy not to have a good solder joint for the ground pins.  Double check.   Extra time here will save you hours later, (Been there, done that! ). 

Note there are two sockets for the Pololu 5V and 3.3V regulators. While the older ones (D24V25F5 and D24V25F3) are still available and use P7 and P16, it seems Pololu is suggesting users use the newer D24V22F5's (5V, 2.5 Amp) units, it has a different pinout, use this one in P14 (not P7).  More recently they also added the equivalent D24V22F3 3.3V regulators. Unfortunately in their wisdom they again changed the pinout connections. You must use the Pololu D24V25F3 3.3 V regulator in P16 or the D24V22F3 regulator in P15.   Be sure you get these regulators/ correct. To be safe once inserted, check the voltage in your system on a 5V and 3.3V IC, (see the schematic) with no chips yet inserted on the board. 5V and 3.3V going to the correct pins of the FPGA adaptor.  (5V going to the 3.3V pins will blow the unit!).  Please note Pololu has come out with more 5V and 3.3v regulators.  Please examine the pinouts and match them with the board sockets.  Unfortunately the newer 5V and 3.3V units look exactly the same on the surface. Presumably some of the internal resistors are different to give 5V and 3.3V.

Note recently the above Pololu regulators have gotten hard to find and have become expensive.  Pololu now has more options to pick from.  Examine the pinout of any of their 5V or 3.3V  regulators and place them in one of the two sets of slots above.  You can also use the EZ-SBC regulators. These are currently cheaper and as best I can tell just as good -- though they have a larger footprint however.

If you instead use the linear regulators again check you are getting 5V and 3.3V from the  LM7805 and LM3940.

Next insert all 5 LED's. Before soldering them in place ground one at a time pins 3,5,7,9 & 11 of U13 to be sure they are OK.    (I always use a blue LED for D2 "Board Active"  in my systems).
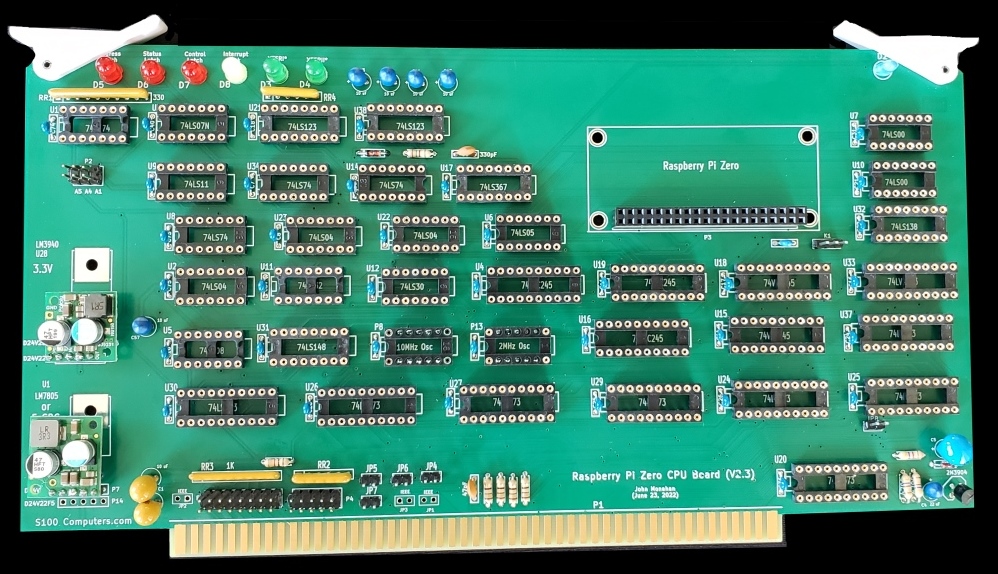
Here is a picture of the board at this stage:  
    Raspberry Pi bard Board

Next add all the
74xx chips and the Raspberry Pi itself.

Jumper JP8 (The S100 bus slave provides it's own Phi Signal).
Jumper K1 1-2. (Configure spare GPIO14 high).
Jumper P2 1-2, 3-4, 5-6.  (Use S100 bus port DDH to activate this slave board.
Jumper P4  1-2.   Use TMA0 S100 bus line

Unless you want the board to be a bus master leave JP4, JP5, JP6 & JP7 open.
The IEEE jumpers are optional.


Software
We will first run a very simple test software routine to be sure the board is working correctly.

Load the
S100_Pi.c program on you PC in Microsoft's Visual Studio (or equivalent editor).
Set the equate "
TEST1 = TRUE".

Use WinSCP to transfer the file over to the Raspberry Pi in
/home/pi/Public/C_Programs
Launch Geany, compile, build and run S100_Pi.c.

The Linux command line console should come up saying:
"
Waiting for Pi Zero Board to be active."
 
From your S100 bus keyboard transfer control from the S100 bus Z80 to the Raspberry Pi CPU with:-
 
QIdd

This activates the Pi board.
With "
TEST1 = TRUE"  the only thing the Pi will do is:-

while(TEST1)                                                     // <--- DIGNOSTIC TEST
    {
    printf("The S100 bus address lines should increase from 0H to FFFFFH\n");
    for(zzz=0; zzz < 0xFFFFF; zzz++)
        {
        RAM_data = ReadRAM(zzz);                                 //Set S100 RAM starting address to 0H
        EndBusCycle();                                           // Also Clear the S100 Bus Status Line
        printf("RAM %6x = %02x \n",(int)zzz, (int)RAM_data);
        }
       printf("\nEnd of RAM test\n");
    EndBusCycle();
    getchar();
        }

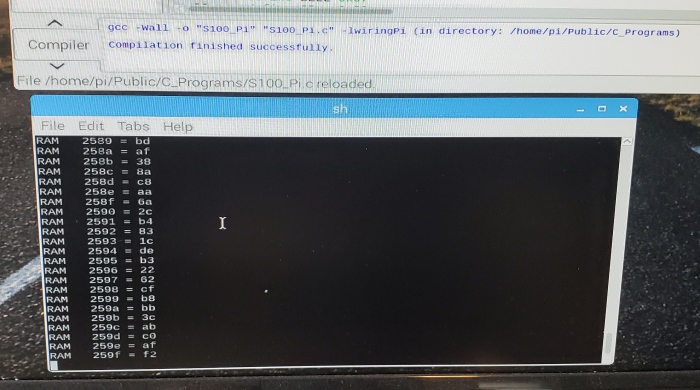
The Linux command line console should come up saying:-
     
    Test1 Output

It will continuously display the contents of the S100 bus RAM.  Also if you have the S100Computers SMB you should see the address line Hex display increasing.
Do not go further unless you get this result.


The Raspberry Pi Monitor Software
Total control of the S100 bus is obtained by programming the Raspberry Pi in C code.  The C code is actually quite large with many repeatedly utilized routines.  These routines totally synthesize ALL the S100 bus signals neede4d to display/change RAM or a Port.  As far as any other S100 bus board knows, there is just another temporary master running the S100 bus -- just like for example, our  6502, 8086 or 68K  CPU's.  You can display RAM, query a port, output to a printer or a speech synthesizer  etc.  It's very important to appreciate that we have a Broadcom system on a chip  (SoC) with an integrated ARM-compatible central processing unit (CPU)  running at 1GHz.  This is like placing a Lamborghini engine in a Honda Civic.  Even though our Pi C code appears verbose,  the chip still spends most of its time waiting for the S100 bus to respond.  Simple (no-optimized C code) to display RAM for example behaves about as fast as a 5MHz Z80.

Running S100_Pi.c
We are now ready to run the main Raspberry Pi board software that will control the S100 bus.   As I said above, this program is fairly large and should be studied carefully to understand what is going on.  The C code is simple in itself with no "fancy" C coding tricks. Essentially the program initializes all the Pi pins as to their input/out modes. It also sets up a few pins to interrupt the Pi while it is running.  It then goes into a continuous loop reading the S100 bus console keyboard commands passing the back as S100 bus signals.   Here is how the process works.

The Pi takes about 30 seconds to initialize on power on. Once it is ready,
Linux will signon and the Pi will continuously monitor its keyboard (and network) interface.
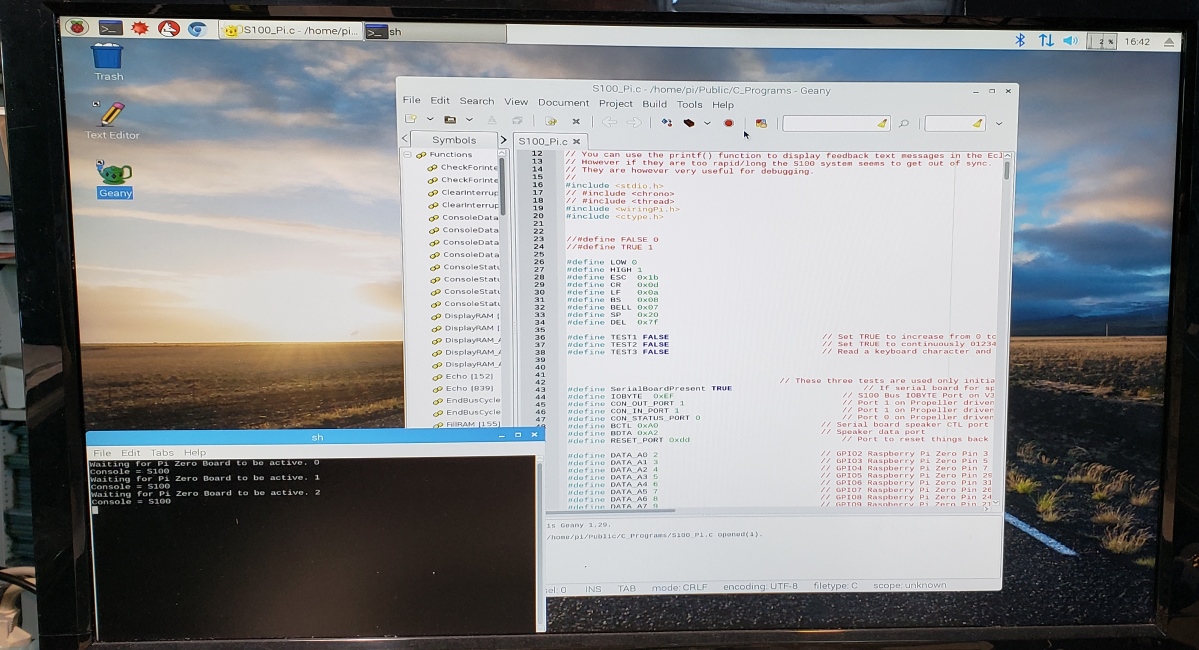
Launch the Pi
Geany program and execute the S100_Pi.c program.

The command shell window will appear and continuously display:-

Waiting for Pi Zero Board to be active
 
   Signon menu 1
    
Then  "ACTIVE" signal line  (GPIO pin 11).  This pin is connected to one of the S100 bus TMA lines, any one of which if pulled low by the S100 bus master, will inactive that board and transfer control over to the Raspberry Pi CPU board.

We do this by inputting the Z80 port 0DDH.
So QIDD will activate this board.  The Z80 is gone from the bus which is now completely controlled by the Raspberry Pi.

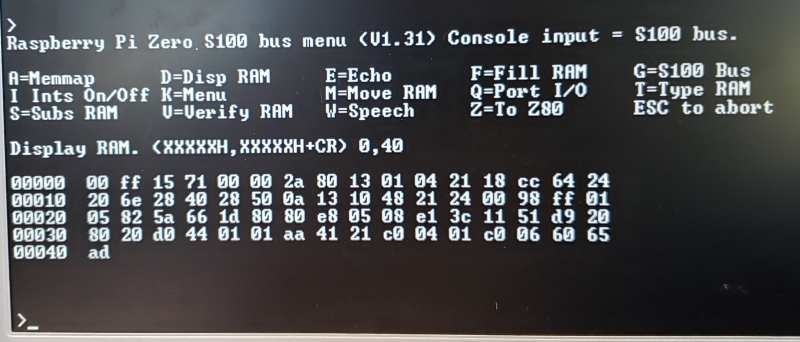
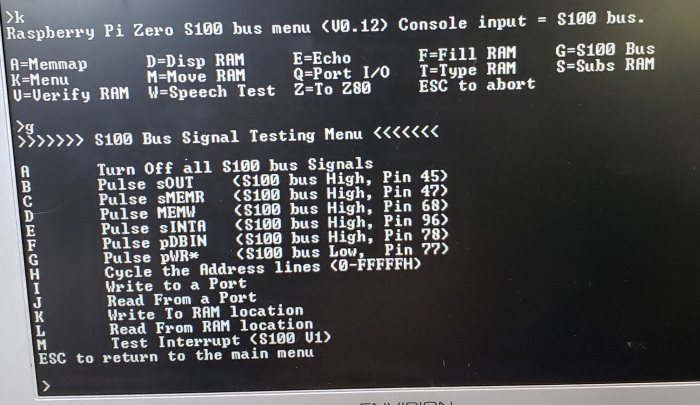
The Pi S100 bus Monitor program will run and should signon like this:-
   
   Menu 3

By now the single character menu commands should be familiar to you.  They are the same "MASTER" monitor commands we use with all our other CPU boards.
If you look at the monitor C code you will see that the approach is very similar to the C code we used to control the Edison CPU board.
The "W" speech command for example will test the Serial IO board speech synthesizer.


CONNECTIONS
There are numerous ways you can connect up your keyboard, mouse and HDMI terminal to this board.  Here is an example.
     
   USB Connections
   
Note you need two keyboards. A USB keyboard to the Raspberry module and a S100 bus keyboard for your S100 bus interface. 
Serial transfer of SIODIAG2.COM  is best done from your Z80 monitor using one of our serial boards and the master monitor "X" command.
(BTW a nice challenge would be to write a bootable "C" program for the Raspberry Pi to do this upon boot up!).


What is this board good for.
There are numerous potential applications.  For example, because the board totally controls the S100 bus.  It can be use as a diagnostic tool to debug bus hardware problems. 
I have added a bus signal  monitor command example in the above Monitor to let you control some critical S100 bus lines. More can be added.
   
        
  Signon Menu2 

Any port on any S100 bus IO card can be controlled under Linux. BTW ignore the
"M" command in the above menu.  It's not yet done.


Interrupts.
In the default configuration of the
S100_Pi program interrupts are not enabled. 

The 'I' menu command listed above will trap an interrupt coming from one or the 8 S100 bus interrupt lines.  The following circuit is activated:
   
    
    Interrupt Circuit
 
This is the same circuit we used for our PDP11 CPU Support board.  U34A signals to the Raspberry Pi an interrupt, it sends back a S100 bus sINTA signal.
U30 latches the interrupt on receiving the S100 bus sINTA signal, U31 and U32 pritorize the interrupt(s)(s) and they are passed on to the Raspberry Pi via U33. 

You have to write your own hardware and software to trigger the interrupts. 
As a crude test you can momentarily ground one of the S100 bus interrupt lines for a demo.  This will probably be a un-denounced signal -- so possibly a few interrupts!


Raspberry Pi CPU Board Parts
The Raspberry Pi Zero is widely available. 

A Production S-100 Board.

Realizing that a number of people might want to utilize a board like this together with a group of people on the  Google Groups S100Computers Forum, a "group purchases" was formed. It is now closed. 
Please see here for more information.  Please do not contact me directly.

      
BUGS.
I have tried the Raspberry Pi Zero 2W on the above board.  It "mostly" works fine except I get occasional errors with the Monitor "A" (memap) command. 
However the monitor did not appear to run much faster in the S100 Bus system -- about the rate of a 2MHz Z80 system.  
Clearly what is needed is a "bard metal" OS/interface.  This is currently above my capabilities.  It does however illustrate the speed superiority (10X) of the Edison Module.

Thomas VonDerHaar has pointed out that the S100 bus signal MWRT is generated directly on the board. According to IEEE-696 specs it is generated only once on the bus master CPU board (or by a bus front panel) by a combination of pWR-sOUT.  There should have been a jumper option to disconnect MWRT to the S100 bus on this board (other S100 Computers slave CPU boards had it). If your master CPU board does not inactivate MWRT when handing bus control over to this board then bend out pin 2 of U24.  Note the S100 Computers Z80 Board allow you to disconnect MWRT during a bus transfer. Compupro CPU boards do not.

Likewise true IEEE-696 boards do not switch the PHI S100 bus signal over to the Slave CPU.  The S100 Computers Z80 Board allows you to use different speeds PHI signals on the CPU master and slave.  Again there should have been a jumper. For true IEE-696 boards bend out pin 13 of U27.

Finally he points out that the board in its current format will not work with true IEEE-696 Disk controllers that use DMA (e.g. the Compupro Disk3).  If you wish to try using this Raspberry Pi board with a disk controller use a disk controller board that uses a port IO interface such as a Versafloppy FDC II or one of the many S100Computers Disk controller boards.


Raspberry Pi CPU Board (V2.3) KiCAD Folder  (.zip File)     V1.0 (8/8/2022)
Raspberry Pi CPU Board (V2.3) Layout
(pdf format)                  V1.0 (8/19/2022) (Supplied by Rick Bromagem)
Raspberry Pi CPU Board (V2.3) BOM
  (pdf format)                   V1.0 (8/19/2022)  (Supplied by Rick Bromagem)
Raspberry Pi CPU Board (V2.3) BOM   (xls format)                     V1.0 (8/19/2022)  (Supplied by Rick Bromagem)

Raspberry Pi CPU Board Gerber Files
(.zip File)                   V1.0 (8/8/2022)
Raspberry Pi CPU Board Schematic 
 (.Pdf File)                   V1.0 (8/8/2022)
Raspberry Pi SD Card Image                                            V1.0 (8/8/2022)  (Note this is a very large file, it will take >30 minutes to download)
Raspberry Pi CPU C Code  (Text File)
                                                      V1.0 (8/8/2022)

WinSCP download for Windows (64 Bit)                                  V1.0 (8/8/2022)


Other pages describing my S-100 hardware and software.
Please click here to continue...

This page was last modified on 09/13/2022