Bringing Up CPM68K for the First Time
Bringing up CPM68K (using a 68000, 68010 or 68030 S-100 Board) can be a somewhat
daunting task for beginners. Not only is the hardware different and you have to
worry about its (often untested) functionality, but the software is an order of
magnitude more complex.
Way back in the early 1980's Digital Research put out its CPM68K
(V1.0) operating
system to run on such 68K systems. It was essentially a conversion of its
CPM3 operating system. Most of the commands and functions were the same as
that used for CPM3. The concept of User Groups and a CPM.SYS file on the
disk was carried over from CPM3.
These features included:-
Disk
performance, especially random I/O, was improved over that of CP/M v2.2 by
hash coding the directory entries and Least Recently Used
(LRU) buffering of directory and
file data.
The BDOS performed auto-login of removable media
drives. The implementation of door open interrupts on removable media drives was
highly recommended as an additional check on data integrity and for providing
disk I/O performance improvements of up to 30%. The door open interrupt
information allowed the BDOS to treat removable media drives in a manner similar
to permanent media drives.
The file system capacity was
larger allowing a storage capacity of up to 512
megabytes for each of the 16 possible logical drives, and the maximum
file size was 32 megabytes. The file system also provided time and date
stamping.
Live control characters and type-ahead were supported
by cooperating routines in the BDOS and BIOS. The live control characters were
CTRL-C, CTRL-S, CTRL-Q, and CTRL-P and their functions were performed when a
keyboard interrupt occurred.
The mapping of the logical
devices CONIN:, CONOUT:, AUXIN;, AUXOUT:, and LST: onto different physical
devices was standardized and made more flexible. This allowed the dynamic
remapping of the console to another device, such as a graphics console. Logical
device output could be directed to several physical devices at once.
The interface to hardware drivers was greatly simplified and improved by
use of a BIOS Kernel. The Kernel was intended for unchanged use in any BIOS
implementation.
For a single user efficient operating system this really was what CPM should
have been all along. As we shall see below it is a joy to write a BIOS
for its very simple and symmetrical interface.
That said, it is not an easy task to build an interface for new 68K hardware.
One really has to be proficient is writing 68K assembly code, programming in C
and dealing with an extremely large memory space.
Fortunately for us this has already been done by Damian Wildie
in Australia. The S100 community owes
him a big thanks for all this work. All of Damians work can be see and
downloaded from
github here.
What I have here is a basic core/summary of that work to get people up and going
with CPM68K.
Unless as otherwise started the software below will work for both our
68000/68010 board and
68030 board.
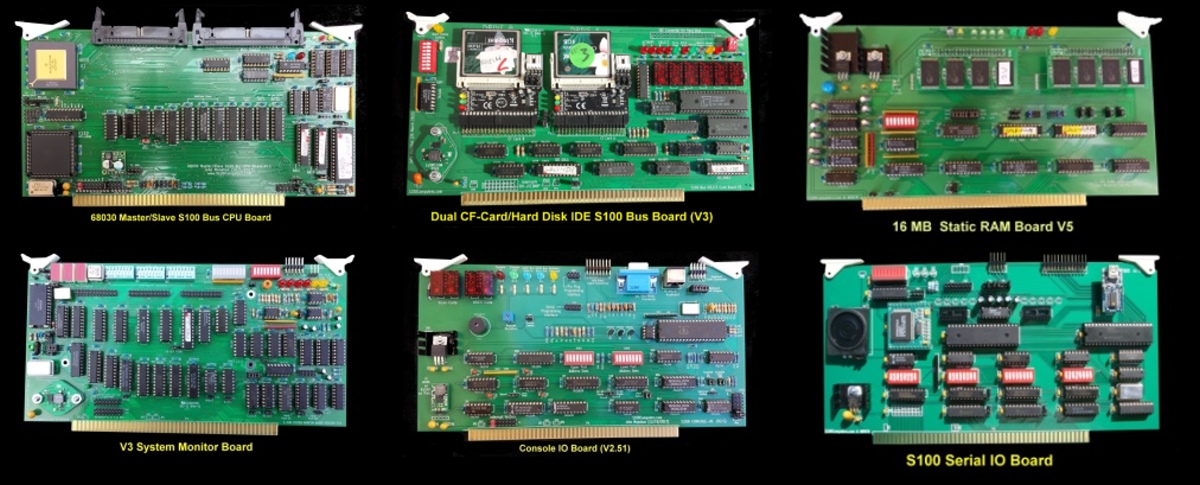
The latter being much faster of course. Both boards use our
IDE/CF Card
dual drive board. Other boards include RAM, a console IO and a
optional Serial port. Here is picture of one setup arrangement.
Please note writing software like this is not easy and definitely not for beginners.
That said what Damian has provided is a "black box" arrangement that should
allow most S100 bus users to get CPM68K up and running easily and reliable with
these boards. Also see the documentation about using CPM68K at the bottom of
this page before starting.
Install CPM68K - The Process
There is not enough room in our
68K ROM monitor (at least
currently) , to boot and operate CPM68K.
Damian has written his own
monitor that has a self contained "Boot" module to load up
CPM68K from the
IDE/CF card drive A:
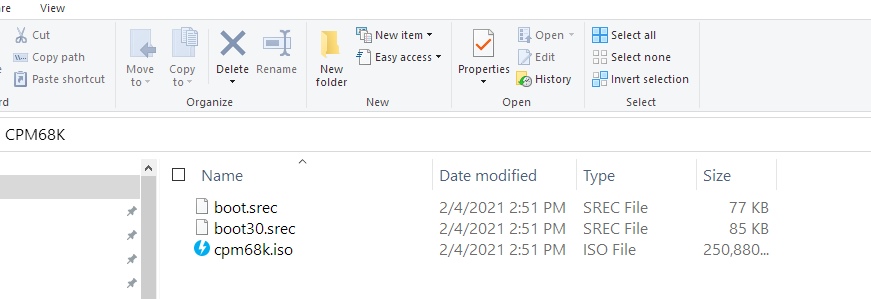
The complete CPM68K file system is in an ISO file called
cpm68K.iso. It can be downloaded from the
bottom of this page.
(or possibly a more updated file from Damians
github site:-
https://github.com/dwildie/cpm-68k/releases).
Here is what the download should look like:-
You need to "burn" the cpm68K.iso file to a CF
card. There are many ways to do this, I use Etcher, see
here.
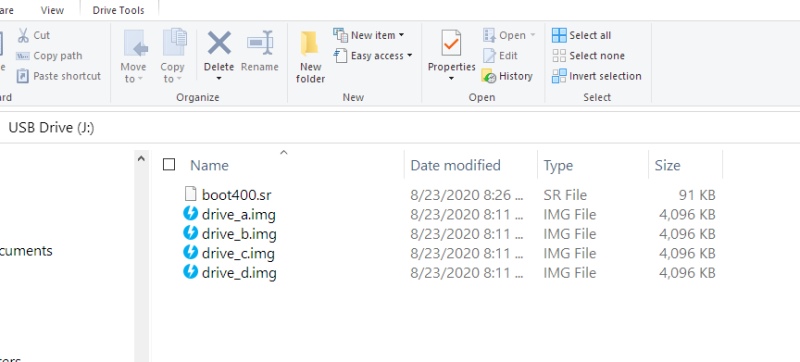
Under Windows 10 the final CF card "Drive" should appear like this after the
cpm68K.iso is "burnt" on to it.
Next we use either of the two files
boot.srec or
boot30.srec and use them to burn a special monitor into our CPU boards ROM.
Exactly
as we did for the 68K Monitor
or 60030 Monitor
we will burn boot.srec into a Low and High byte
of 28C256 ROMs for our
68K
board or burn boot30.srec into a
29EE010 ROM for our
68030
board.
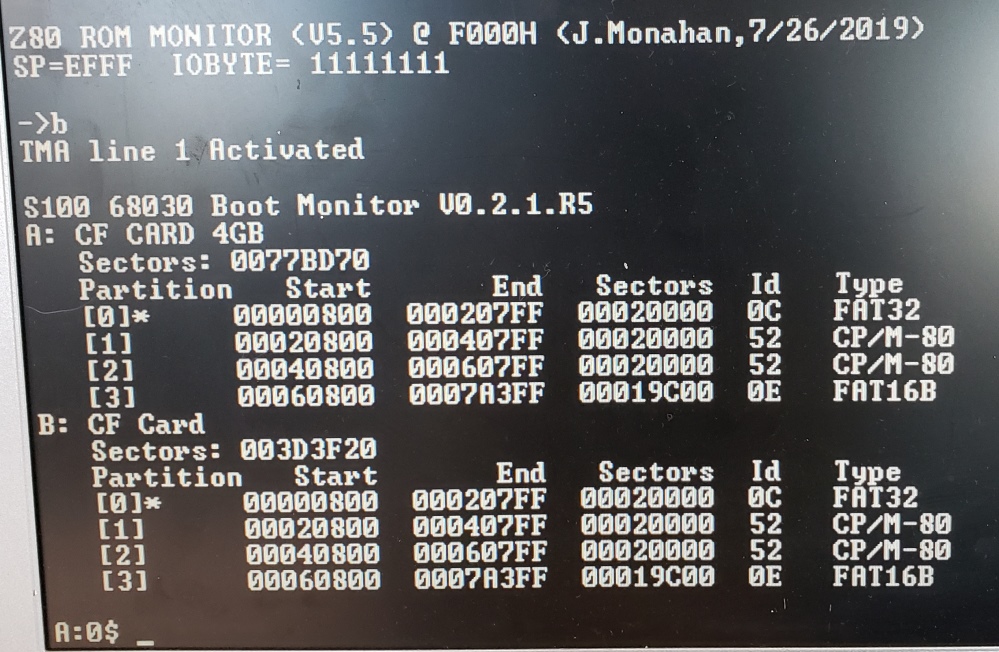
We insert the CF card into the A: drive of then use the Z80 monitor
"B" command to activate the 68K or 68030
boards.
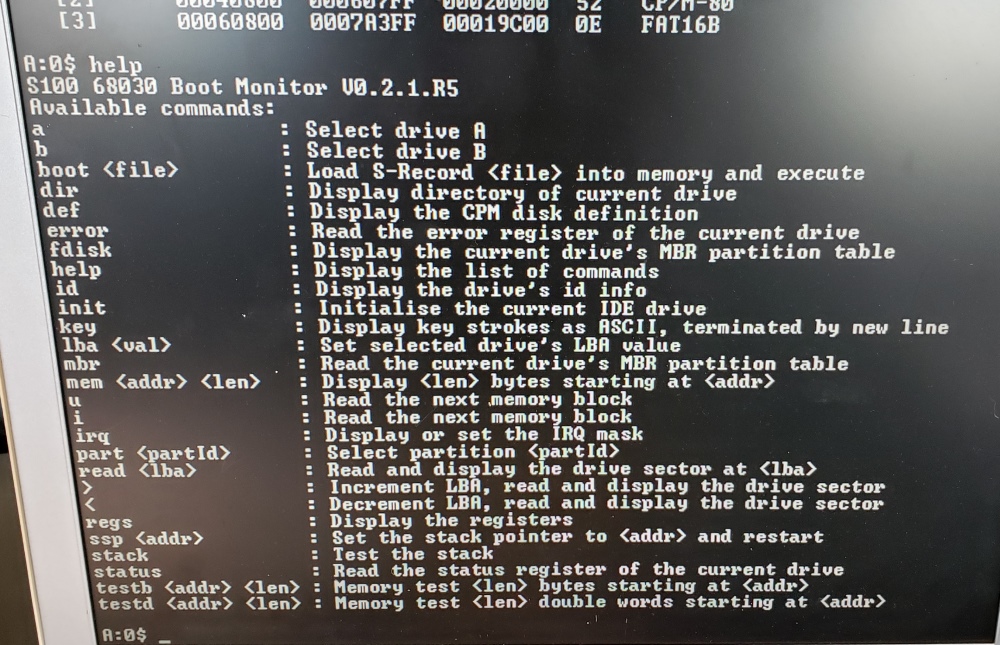
Here is a picture of the initial sign-on screen for
boot30 on the 68010 board.
This is the initial Signon screen. There are many monitor options.
Type HELP to see them listed:-
As you can see many are similar to the original 68K or 68030 monitor
IDE/CF card menu options.
It's important to realize however we are not in CPM68K yet. This is just the ROM
monitor, so dir will show you the partitions on the
A: drive, not the contents of
any one partition.
Most of the above commands are self explanatory from their name.
LBA sets the program pointer to a disk
LBA address. The type and number of partitions is user defined. Damian
has 4 on his "CPM68K disk".
You can see in the above example there are 4 partitions on this CF card.
The boot command will always bring up the
current partition which on boot-up is always 0.
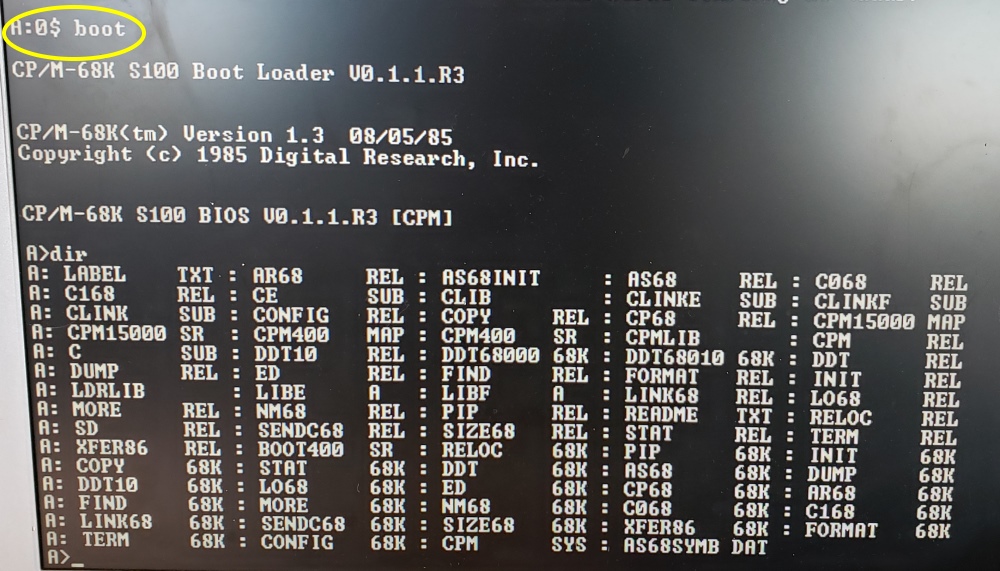
Typing boot should yield:-
What an amazing sight! In a few simple moves you have a complete fully
functional Digital Research CPM68K Operating System up and running.
Anybody used to CPM 2.2 or CPM3 will have no problem using the commands and
programs.
The CPM.SYS file is there as is
STAT, DDT, ED, PIP etc. Not all the
programs work however, they may be hardware configuration specific.
The CPM-68K System Guide can be downloaded from the bottom of
this page.
To change the default partition in the top level monitor (before booting up CPM)
you use the monitor command part 1, part 2, part3
etc. Then the boot command will boot up
the operating system in that partition.
The above CF Card image has been partitioned into four
partitions using DOS/Windows fdisk. It is
really a test/demo set of images and has several different options for
booting on the 68K & 68030 boards.
Use the "part n" command to change partitions,
e.g. "part 1" to switch to partition 1.
Partition 0
This is a FAT32 partition that contains 4 CP/M disk images. In CP/M-68K
these will be available as disks A, B, C & D. The drive_a.img is bootable.
As we say above to boot, with partition 0 selected, use the "boot" command.
You will then get a CP/M-68K prompt.
This cpm.sys has been built for the 68010 CPU but will work on both the 68000 &
68030 CPUs.
Partition 1
Switch to partition 1 with command "part 1"
This is a native CP/M file system. It consists of 10 "stacked" 4MB CP/M
disks. These images will appear as drives A - J in CP/M-68K
Use the "dir" command to show the files in the first disk image, this disk is
bootable.
To boot, with partition 1 selected, use the "boot" command, You will then get a
CP/M-68K prompt.
This cpm.sys has been built for the 68010 CPU but will work on both the 68000 &
68030 CPUs.
Partition 2
It has the same as partition 1 but the disk image has not been made bootable.
It must be booted using "boot boot400.sr" and then the CP/M commands applied to
make it bootable.
Partition 3
It also has the same as partition 0 but uses FAT16 and the disk image
has not been made bootable. It must be booted using "boot boot400.sr" and
then the CP/M commands applied to make it bootable
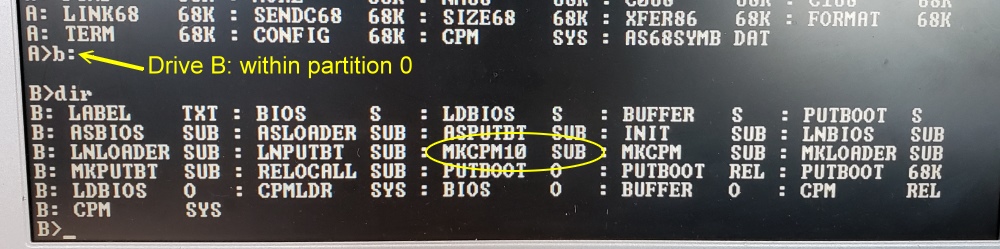
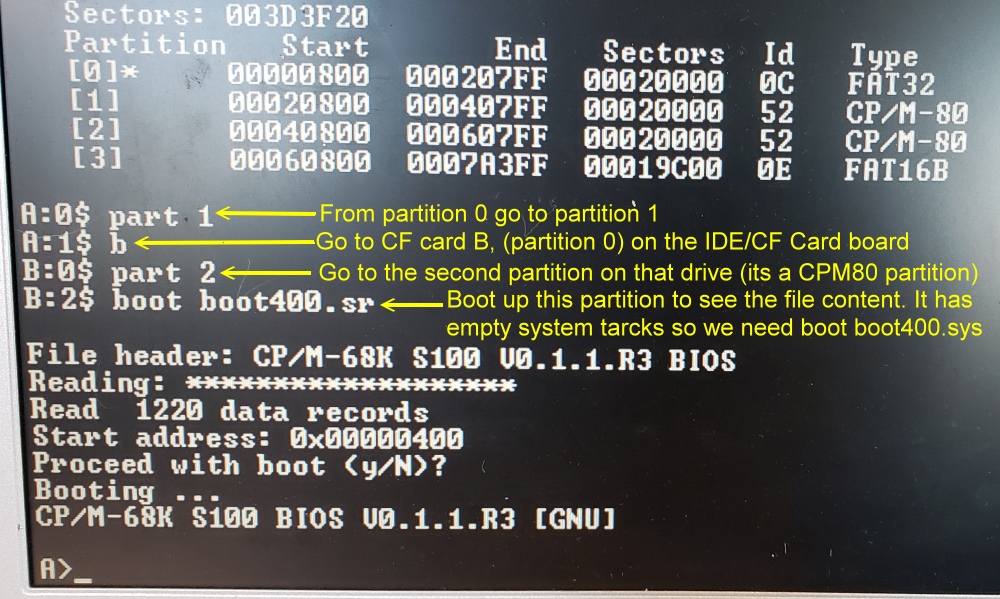
If within the partition 0, after boot, you go too the B:
disk you will see something like this:-
The “boot” command in the monitor alone will
attempt to boot CP/M68K using the bootloader on the
current partition's CPM image system track. There is a loader on the
part 0 disk_a.img's system track and the part 1
system track. If the is no bootloader on a CPM disk's image track e.g. part 2 or
part 3 above, you need to specify “boot boot400.sr”
where boot400.sr is picked up from the current
partition's file system. Boot tracks in all cases are as defined by "diskdef
4mb-hd-0".
BTW, For any program you have assembled in s-record format, the boot command can
be used to run it. It is not limited to just
boot400.sr.
Here are CP/M commands to create a bootable A: disk
A>b:init
This relocates all the relocatable binaries to absolute .68k format and
initializes the assembler. Only needs to be re-executed if the systems
memory configuration changes.
A>b:mkputbt
Assembles, links & relocates the utility to write the boot loader to the disk's
boot tracks.
A>b:mkloader
Assembles & links the boot loader and uses the put boot utility to write it to
the Disk A boot tracks.
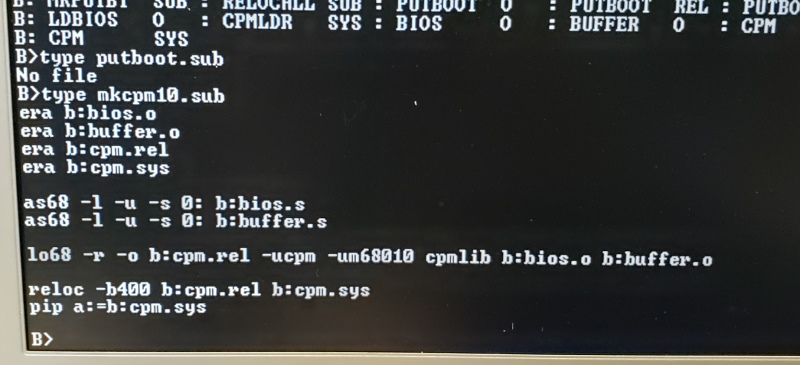
A>b:mkcpm10 Generates a
cpm.sys and copies to Drive A. This
version of cpm.sys will work on 68000,68010 & 68030 CPUs.
These are all standard CPM submit commands. For example if you look at
mkcpm10.sub it will read:-
Remember now the B: drive above is the drive in
the CF card partition 0. It in not the physical CF card
B: on your IDE/CF card board.
Drive A contains standard CP/M commands
Drive B contains command files and source to build the bios,
cpm.sys, the boot loader and the utility to write the boot loader to the disk.
The
disk images produced in Damians github project are not initially bootable. On
the CPM/68K distribution floppies, Digital Research provided
cpm400.sr which is CPM/68K without any bios in
s-record format intended to be loaded at 400H
in RAM. The github project combines cpm400.sr
with the assembled bios to produce boot400.sr.
You will find boot400.sr on each partition.
The initial boot of a partition is performed by the monitor loading
boot400.sr into memory at address
400H in RAM and jumping to
400H in RAM to start CP/M-68K, the monitor
command to do this is "boot boot400.sr".
Once cpm400.sr is booted, the
cmd files on drive B are used to assemble the
bios, boot loader, putboot utility and to create
cpm.sys. The putboot utility is
then used to write the bootloader to the disk's boot tracks to create a bootable
disk. This creation of the initial cpm.sys
must be done using a 68000 CPU (it will fail on a 68010 or 68030). Once
the disk has been made bootable using this process it can be booted with the
monitors "boot" command which reads the
bootloader from the disk into high memory and jumps to its start address.
The bootloader then loads cpm.sys. The
whole process is similar as to how
CPM3 is booted on Z80 systems.
The reason the above initial cpm.sys must be done on a
68000 is because
the 68000 did not meet the criteria for virtualization. For the 68010 and
68030, the MOVE from SR instruction was made privileged. The assembler & linker
(and some other commands) use this instruction. When
cpm.sys is built with the 68010 or 68030 CPU, an exception handler is
added which traps the illegal instruction and executes an equivalent. This way
the commands do not need to be recompiled.
Note however, all the code required to generate
cpm.sys is on disk B in the above partition 0,
you don't need to get anything from github. A 68000 is only required to generate
the first cpm.sys.
The original cpm.sys (boot400.sr) created
from the Digital Research cpm400.sr will not
work correctly on a 68010 or later CPU. After the first
cpm.sys has been created as described above, a
68010 or 68030 can subsequently be used.
Damian also
noted that:-
The Digital Research provided
cpm400.sr file has a defect which leads to the
bios being corrupted. His github project patches this defect.
The implemented CP/M-68 bios is a "lightweight"
implementation, it uses the monitors functionality to access the
Propeller console IO board and
IDE/CF Board.
You
can add additional drives by inserting the CF Card into your windows PC and
copying one of the existing images to drive_e.img,
drive_f.img, etc.
You select a partition with the
part command.
Remember you can get to any image in any partition from the monitor:-
| |
 |
Working with cpmtools and CPM68K
Many of the
above files mentioned above are contained in
.img files. "Image files" as they
are called, started off as files to store a complete image of a disc for
software/game installation files on a CD or DVD. They have now expanded to any
file use and any disk type. There are a number of programs to view and
process them. For CPM file containing image files a popular on is Michael
Haardth's cpmtools
which can be downloaded from here:-
www.cpm8680.com/cpmtools/cpmtoolsWin32.zip or the bottom of this page.
This package allows to access CP/M file systems similar to the well-known
mtools package, which
accesses MSDOS
file systems. Currently it contains:-
cpmls
- list sorted directory with output similar to ls, DIR, P2DOS DIR and CP/M3
DIR[FULL]
cpmcp
- copy files from and to CP/M file systems
cpmrm
- erase files from CP/M file systems
cpmchmod
- change file permissions
cpmchattr
- change file attributes
mkfs.cpm
- make a CP/M file system
fsck.cpm
- check and repair a CP/M file system (only simple errors can be repaired so
far). Some images of broken file systems are provided for testing.
fsed.cpm
- view CP/M file system manual pages for everything including the CP/M file
system format
All CP/M file system features are supported. User numbers are specified as
user:file.
Expand the above .zip
file into a new windows directory such as
C:\Users\User name\CPM\
Next as an example, lets download one of Damians disk images: https://github.com/dwildie/cpm-68k/releases/download/V0.0.1/disk1.img
to the same windows directory.
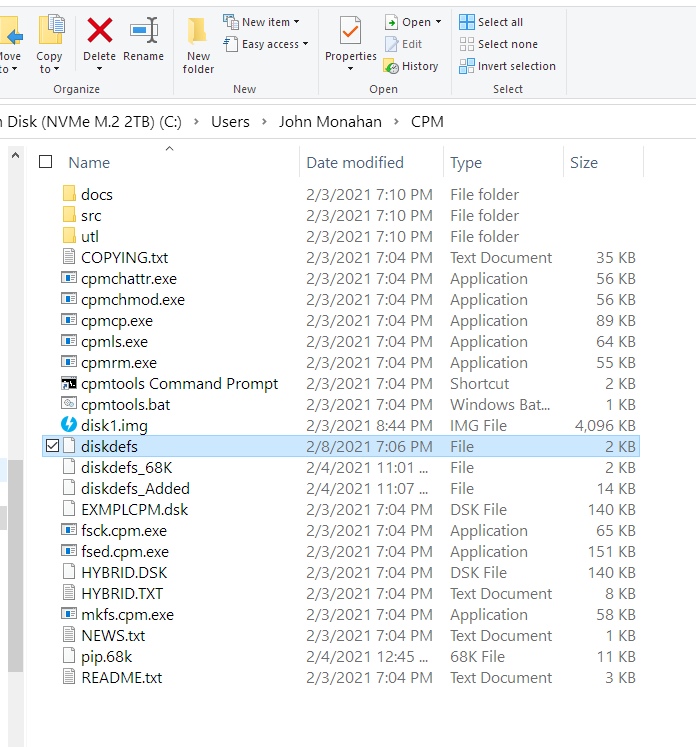
The directory contents should now look like this:-
Let's use cpmtools
to see the actual files in disk1.img.
Before we do this however we need to tell cmptools what the disk format of
disk1.img actually is.
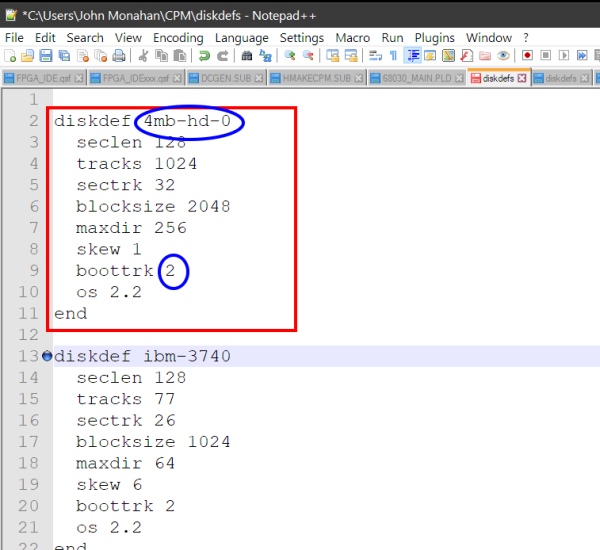
Many formats are supplied in the .zip download in the
diskdefs file.
However the ones we use here for CPM68K are not. We must open the
diskdefs file and add a
few lines that name and describe our new format.
Use Notepad++ or WordPad (not Notepad) to add the extra addition to the
diskdefs file:-
4mb-hd-0 will be
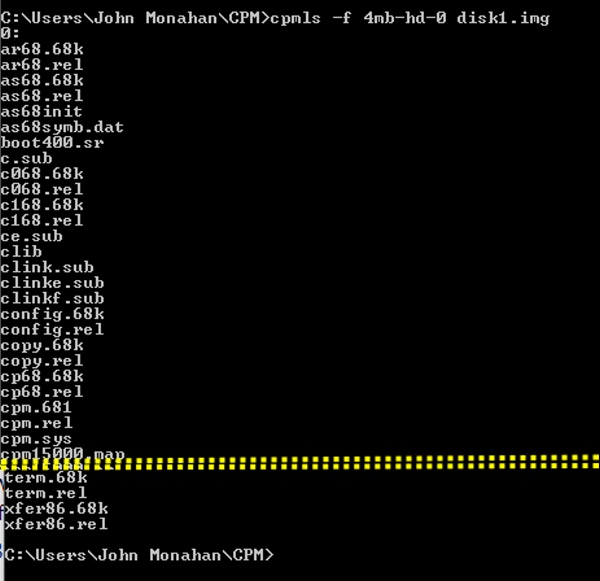
the name of our new format. Then if type:-
cpmls -f
4mb-hd-0 disk1.img
you will see the files present in disk1.img:-
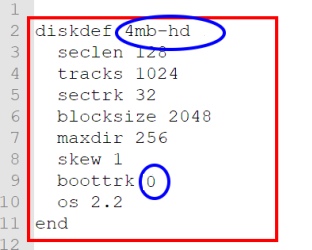
There are actually two file types in Damian's disk image files. Some do not have
system tracks so in the above we also have a diskdef of
"4mb-hd":-
and use:-
cpmls -f
4mb-hd disk2.img
Other commands include:
To
copy a file from the image:
C:\TEMP\cpmtools>cpmcp -f 4mb-hd-0 disk0.img 0:cpm.sys
To copy a
file to the image:
C:\TEMP\cpmtools>cpmcp -f 4mb-hd-0 disk0.img hello.txt 0:
Note also the image files don't have to be in the above
CPM directory. Any valid directory path can be used.
The CPM68K CF
Card image can be found in the
CF Card Images Page
Modifying CPM68K BIOS
for New Hardware
Let me say right off this is not simple and is definitely not for beginners.
If you are not familiar with Digital Research's CPM systems you should read
about modifying a CPM3 system first. See
here
and
here.
Damian's
CPM68K github project
has everything you need to extend CPM68K to new hardware. You should go to that
site and study it extensively.
You can used the gnu 68k cross tool chain to compile, assemble and link the
monitors. The gnu tools are the "standard" build tools for C & C++ on
Linux.
They can also be used on Windows, see https://gnutoolchains.com/m68k-elf/.
However Damian created a Docker image, source here https://github.com/dwildie/68k-tools,
that provides all the tools (gnu, cpmtools, srec_cat, etc.) required to build
the project but it excludes the IDE.
For the IDE, he used Eclipse (which is what Quartus is based on), https://www.eclipse.org/downloads/packages/release/2020-12/r/eclipse-ide-cc-developers and
a plugin that he wrote that indexes and hyperlinks the assembler source, auto
formats, etc. This eliminates the frustration and lack of productivity
using Easy68K but does not (yet) provide the integrated debugging that easy68k
does.
The links below will contain the most recent versions of the above software.
Note, it may change over time and may not correlate
exactly with the text in the article above.
CPM-68K System
Guide.pdf
(2/8/2021)
CPM-68K
Users_Guide.pdf
(2/10/2021)
CPM-68K
Programmers
Guide.pdf
(2/10/2021)
CPM-68K C
Programming
Guide.pdf
(2/10/2021)
boot.srec
(2/8/2021)
boot30.srec
(2/8/2021)
Boot Files.zip
(2/8/2021)
cpm68k.iso (250MG File)
(2/8/2021)
cpmtoolsWin32.zip
(2/8/2021)
Disk1.img
(2/8/2021)
This page was last modified
on
01/25/2022