A 68000 Monitor Any 68000 S-100 board normally needs a built in monitor
program to monitor its ability to interact with other S-100 bus boards.
Unlike the Intel 16 bit family of CPU's, the 68K starts up at 0H in RAM -- every time,
no exceptions. In the first four bytes of RAM it expects to find the location
for its stack pointer (register A7). It will always put what is there in A7.
In the next four bytes of RAM it expects to find the RAM location for its
program counter. With that value it will then jump to any location in its 16M
address space. These locations are hard wired into the chip. So any boot ROM
must contain them in its first 8 bytes. After that you can do what you like,
but remember the CPU must start at 0H in RAM. This is in marked contrast to the
Intel CPU CPU 32 bit line of CPUs which start at FFFF0H
or FFFFF0H.
Now you could place a ROM monitor always at 0H in RAM, but except for a
dedicated application it would conflict with other software. S-100 boards
generally have a hardware "trick" that either switches out the Boot ROM or fools
the 68K CPU into thinking it is reading from 0H RAM after a hardware reset.
The latter case is what our
68K
S-100 board does.
Remember also for the 68K there are no special control/status signals for the
control of I/O ports. As far as the 68K is concerned an I/O port is just another
memory location. In order to emulate the S-100 bus port I/O status signals we
set aside a block of the 68K's RAM address space for port I/O. The easiest block
to use in hardware is the 64K space from FF0000 to
FFFFFF. Clearly way
overkill, but with 16 MB of RAM we can afford to be sloppy. So if the address
lines A17-A23 are all high, pin 8 of U10 (a 74LS30, see
here) goes low activating the S-100 bus port I/O signals (sOUT or
sINP).
Port 01 is the Propeller driven
Console I/O board data input port. An byte write of 33H
to RAM address 00FF0001H (port
01H), should place an ASCII "3" character on the screen.
Assembling 68K Programs.
There are many good assemblers for the 68000 family of CPU's. I have been using
a fantastic package written some time ago by Tim Larson, Paul McKee and Chuck
Kelly called "Easy68K". It can be downloaded from
here. It runs as its own self contained
IDE in windows. Not only does it have a complete assembler but it has a self
contained Run and Debug interface. The only catch is that all console IO goes
through the 68k software interrupt Trap #15. Using this debugger you can
quickly write and test code before programming an EEPROM. The only change being
you replace Trap #15 with an output to your Console I/O port. In all my code
examples then you will see some sections commented out to prevent interrupt
Trap#15 at runtime.
A S100Computers 68K Monitor.
My goal is to model a 68K monitor after the
8086 monitor I wrote. I wanted to
use all the same menu options -- to keep life simple. I should point out that
there are a number of excellent well tested 68K monitor programs out there. The
Motorola Educational Computer "Tutor" perhaps being the best known. As a
total beginner I have found understanding this program a little tricky. If
needed it can be seen
here.
I have opted to write my own 68K monitor. First to learn 68K assembly
programming, but perhaps more important, it will allow me to more easily later
splice in code (as I have in the 8086 monitor) to run diagnostic tests on our
IDE and
ZFDC controller boards. This should help a lot getting CPM-68K up and
running. Note this 68000 monitor program is still "a work in
progress". The Windows emulator Easy68K has been very useful in laying
the groundwork and initial debugging. The most up to date versions can be
obtained at the bottom of this page. The current commands are as follows:-
Of particular note is the "C" menu command. This command allows you to download
an file from a PC via a serial port connection. It is
currently configured for the serial port on the S100 bus
Serial I/O board. The XMODEM protocol is used. This is the same
protocol we use for our Z80 and 8086 monitors to typically download
.bin
files. Before the download the monitor will request where in the 68K's 16MB
address space the program is to be loaded. Once downloaded, you can use
the monitor "G" to have the 68K jump to that location.
This is very useful for developing new software and indeed developing the 68K
monitor itself. The default baud rate for this monitor is 38400, NP 1 Stop
bit. These days of course one normally uses a USB to serial port
connection to a PC.
Unlike the Intel/Zilog chips, Motorola 68K programs are often distributed in "S" file
formats instead of HEX or .BIN files. For example the above Easy68K
program assembles the file into a .S68, "S" file format.
Fortunately there is an excellent simple program (written back in 2000, by
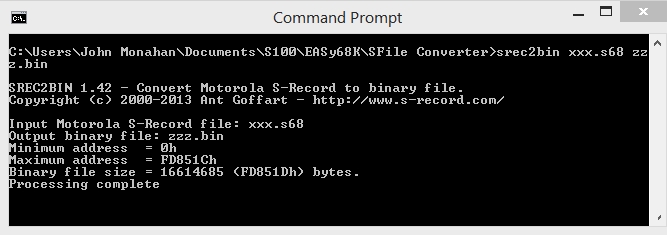
Ant Goffart) called srec2bin.exe, to convert "S" files to .bin files.
The program downloaded is at the bottom of this page. It runs under
windows in the Command Prompt box. Use:-
The command is:- srce2bin input.s output.bin
BTW, there is another way to convert Motorola ".S" files to ".BIN" files if you
use the Wellon series of ROM Programmers. You load the ".S" program by
clicking on the "Load File" button. If you then "Save File", is will save
the file in a .bin format. (You don't actually need the programmer hardware BTW.
The program can be downloaded from
here).
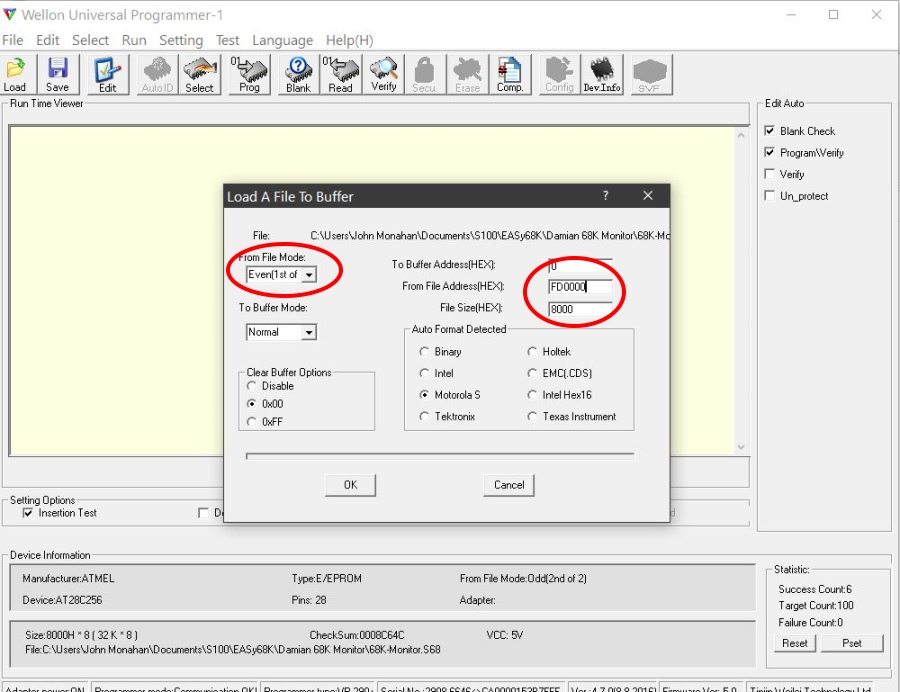
If you have an actual Wellon EEPROM Programmer, here is a picture of the burn
menu:-
Since we have a 16 bit CPU we will have a LOW/EVEN and HIGH/ODD Byte pair of
ROM's. Make sure the "File Address" is FD0000H.
Assuming you are launching the 68K Board in slave mode from your Z80 CPU board
with our
SMB, you can use the Z80 Master monitor "B"
command to pull the S100 bus TMA line 2 low (P5 jumpered 5-6) to activate the
68K board. If you don't have a S100Computer Z80 CPU board/SMB combination
somehow you need to pull the S100 bus line TMA2 low (Pin 57). As a
last resort you can temporally ground the P5, 5-6 jumper with a grounded probe.
Since this ground is not denounced, you may have to try it a few times.
All the normal CPU monitor commands will appear in a menu. Most are
obvious and follow the format we used for the Z80 master and 8086 monitors.
See the table above.
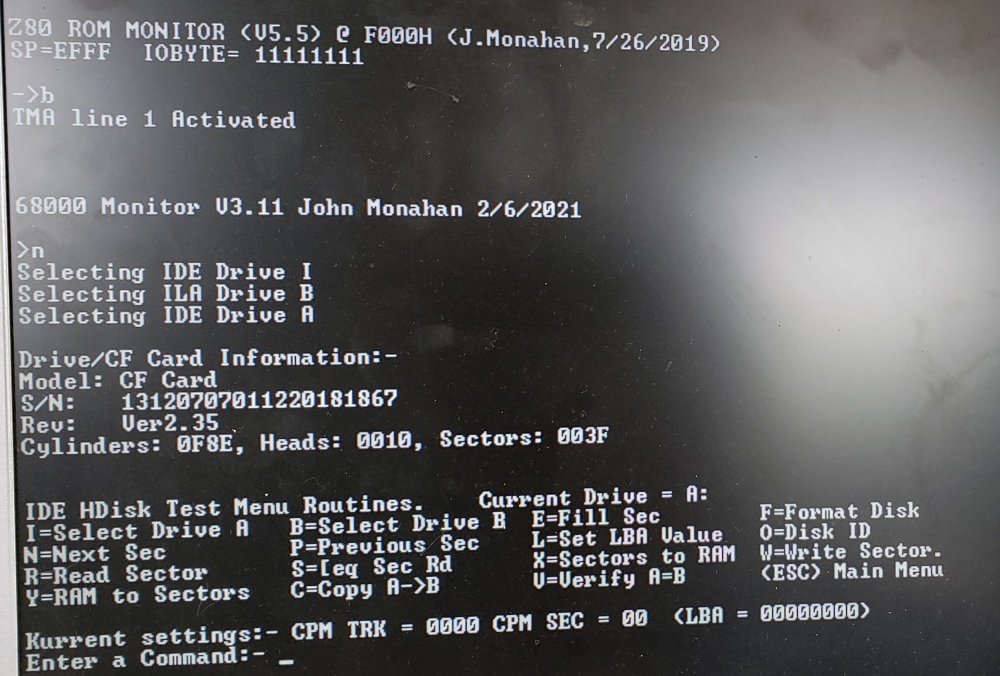
The "N" command brings up the IDE/CF Dual Drive Board sub-menu as shown here.
This menu is very similar to the diagnostic menu we had for the IDE/CF Dual
drive board.
Here is an example of a sector read "R" command.
Before going on to install CPM68K checkout all menu options in the "N" IDE Drive
sub menu first. They must be 100% reliable and reproducible.
Unfortunately not all CF cards work with this board/software. This is an old
problem, the "O" command works fine displaying the
CF card format etc. but one cannot read a sector. It seem to be related to
the width of the power on reset signal to the card. Your first option should
be to reformat the card in windows. Failing that, try a different card. I find
I have better luck with the older (a few GB) Type II cards than with the new
very high capacity cards.
Here is a picture of some of 3 very common CF cards I use that are always 100%
reliable:-
Please note in its current
configuration the CF card software assumes up to 0FFH Tracks with 0FFH 512 byte
sectors/Track for all cards. This can be easily changed in the equates at
the beginning of the monitor, but it has the advantage that the Drive "Y" copy
command will copy any operating system from Drive A: to B: correctly (e.g.
CPM3 formats, CPM86 or MSDOS).
The links below will contain the most recent versions of the above software.
Note, it may change over time and may not correlate
exactly with the text in the article above.