
| Home | S-100 Boards | History | New Boards | Software | Boards For Sale |
| Forum | Other Web Sites | News | Index |
CREATING BOOTABLE CPM3 SYSTEM DISKS
We now have a large number of different S100 Computer Disk controller boards using hard disks, Floppy Disks, CF cards and SD cards to boot and run CPM3.
We need to write software to interface with one or more of the following boards:-
The original IDE/CF card board , the Z80 driven ZFDC Floppy disk controller board , the Z80 SBC , the FPGA Z80 SBC ,
the 3 FPGA Disk Controller boards , the 2CF+SD Board and the Dual SD card board .
There is of course also a larger number of vintage S100 disk controller boards from the 1960's and 1970's that often need bootable disks.
The good news is the process of writing a bootable CPM3 BIOS and CPM3.SYS file for all this hardware is much the same.
That said, the process is quite tricky and over time one forgets the critical steps/details.
This page is a step by step review of the process. Because of the large number disk controller boards involved I will treat each board differently.
Also because of the block of time involved I will only be able to account for one board at a time spread over many months when I have spare time!
It would be great if others could send me details in the format below for other boards.
Please read the Digital Research CPM3 Guide if you need more information.
The only other board requirement is a Console IO Board for these basic CPM3 implementations.
In all the Operating system on CF card images here, it is assumed the console IO board is the Propeller Driven Console IO Board (all versions).
Actually it does not have to be that, any console board that has a status port at 0H and an ASCII data port at 1H will work using the following routine, will work:
CI: IN A,(CONSOL_STATUS)
AND 02H
JR Z,CI
IN A,(CONSOL_IN)
RET
CO: IN A,(CONSOL_STATUS)
AND 4H
JR Z,CO
LD A,C
OUT (CONSOL_OUT),A
RET
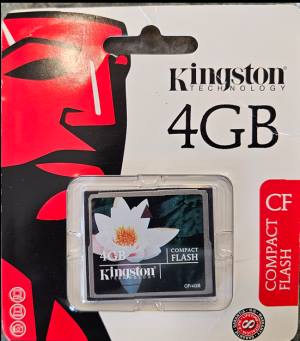
Note not all CF cards are created equal! The images below were all made on new 2 or 4GB Kingston or Verbatim CF Cards.
These are CF cards unused and in their origional wrapper. Here is an example:-
|
Recently used CF cards on eBay etc. have become common. I have found many of these cards fail to format/disk copy correctly.
This is because the card internally is "worn". The circuit within the CF card is no longer correctly updating/refreshing the sectors.
While not a problem if one pixel is dropped for a picture it is for a disk OS like we have here. The symptoms usually appear as the CF card is booted from the monitor.
It just hangs after reading in the boot sectors.
CLONING CF CARDS .
There are two ways to make a functional CPM3 CF Card. Either copy/clone a functional CF card or program a blank CF card.
If you are starting off your best option is to clone one of the many CF card "images" on this web site. They are all described below.
To clone a CPM CF image you start with a ". imgc " file listed on this web site. You need the Windows program HDD Raw Copy Tool to make a fully functional CPM3 'disk'.
There are a number of disk image files below corresponding to different S100 bus hardware setups. You can download them from this page.
Because they are actual sector by sector CF card copies they are quite large (typically 6-7MB). Typically I use 4GB CF Cards. This is way overkill for CPM3 (but not MSDOS etc.).
Here is a local download for the HHD Raw Copy Tool:-
HHD RAW Copy Tool (install file from https://hddguru.com/software/HDD-Raw-Copy-Tool/ )
Here is a picture of HHD Raw Copy being used to unpack the FPGA_DC_CPM_Image.imgc on to a CF card.
Actually since our CPM3 disk is only 0FFH tracks, with 0FFH Sectors/Track maximum, you can probably stop the unpacking process after sector 0FFFFH (65,535).
Here is how the "unpacking" dialog looks:-

|
It seems all CF cards were not created equal! There is an issue with CF cards not working in the IDE/CF card drive if you don't use an NEC 82C55A chip.
On top of that I have found that some CF cards do not boot correctly - particularly the older <2GB capacity cards.
Please try and use the 4GB Verbatim or Kingston CF Cards or one of the others below. With these (while more expensive than some others),
I have never had a programming/boot issue with these cards with any of our Disk controller boards.
You can also use an IDE/CF to SD card adaptor. An SD card in these adaptors behave as a CF card.

|
When done, simply plop the newly formed CF card into your S100 bus hardware and off you go!
One final point, HDD Raw Copy Tool does not know about CPM. For CF card copying It just copies sectors one after the other. In doing so it does compress the data.
The .imgc file is a compressed sector by sector image file. While CPM itself will only take up at the most 8MG of a CF card what is on the remaining CF card sectors determines the size of the .imgc file.
If you use an old card with lots of data on it - the final .imgc file can be GB in size.
This slows down file uploading and downloading on the web. Its best before using a CF card to "wipe" it clean with 0's.
Use the windows CMD program diskpart .
At the DISKPART> prompt enter:
list disk
You will see something similar to:
Disk 0 1863 GB
Disk 1 931 GB
Disk 2 256 MB
select disk 2
detail disk
select Volume xx
remove
clean all
When it finishes, enter:
exit
One slightly annoying thing about DiskPart: while clean all is running, it generally doesn't display a percentage/progress indicator
For a 4 GB CF card, diskpart → clean all will typically take roughly 5–20 minutes, depending mainly on the CF card and USB reader's write speed.
Then place this CF card in your S100 system B: drive
Do an ERASE B:*.*
Then copy your new A: drive data across followed by MYIDE.COM or PIP.COM + CFSYSGEN
If you then save this CF card as an imgc file with HDD Raw copy it will be a small size.
Alternative you can use the slower MYIDE.COM program.
All the actual CF Card '.imgc" files and source code files can be found here:- CF Card Images
CLONING A CF CARD WITH MYIDE.COM
There is a second way to clone a CF card. If you already have a functional CF card put it in the A: slot of your IDE/CF card containing board.
Put the blank CF card in the B: slot and launch the CPM3 program MYIDE.COM from the A: CF card. Copy everything from A:->B: with the 'Y" menu option.
When done pop the B: CF card into the A: slot and boot CPM3. You can erase any files you don't need.
This is often the quickest way to duplicate large multi-file CF cards (or IDE hard disks).
Here is a picture of the process:-

|
So long as you just need simple CPM3 systems with no extra "Bell and Whistles" the above cloning methods are fine.
If you need to add extra hardware you need to dig a little deeper.
MAKING A CPM3 BOOTABLE CF CARD FROM SCRATCH
To understand the process of writing and installing a CPM3 system from scratch you should first thoroughly study the theory. It is described in detail here and here .
You need to thoroughly understand the process described there to move further here.
There are a few other software programs you need to become very familiar with:-
Altair.com
While in theory you could write and modify the programs below using an already running CPM system from a floppy disk or hard disk (and many of us did this in the past),
today we do we do everything on a PC is a special window dialog box that behaves exactly like a CPM3 operating system (except it behaves like a 100Mhz Z80).
This PC program ALTAIR.COM written by Peter Schorn is one of the unsung heroes in software writing for S100 computers. Most here will probably be quite familiar with it.
If not study in detail the Altair documentation. To assemble and run the CPM programs here you only need to launch the CPM3 emulator within the Altair.com program itself.
From then on (transparent to you) you are operating under CPM3 in a Windows box. The necessary software and instructions are all described here.
PCGET.ASM and USBGET.ASM
We need a way to move the final CPM3.SYS file (and others), from the working Altair PC folder to the S100 bus system.
Clearly you cannot dump the file to a CF or SD card on a PC and read it in the S100 Bus system (because of the vastly different disk formats).
Normally we do this using either the RS232 Serial port or USB port on our Serial Board connected via a cable to the PC. For the serial port these days we use a serial to USB adaptor cable.
I highly recommend the USB port using USBGET.COM program. Both PCGET and USBGET are standard CPM programs.
This brings up the chicken and egg issue of how do you download if you are building a CPM3 image from scratch.
These days fortunately there are a large number of CF card disk images with already bootable images on CF cards. See here .
These will get you going to write and extend the basic CPM3 facilities tailored to your exact hardware setups.
Folders/File Names
We will see that there are a large number of files involved is constructing CPM3 images for various types of hardware.
It is absolutely essential you keep each CPM3.SYS image collection and submit files is a separate folder.
Within these folders the same file names are used but internally are quite different. It's a disaster if they get mixed up!
I use a separate Windows folder for each S100 board. I use two sub-folders for a Banked CPM3 system and a Non-Banked CPM3 system
Here is an example of a file directory structure I use:-
Boot on IDE Board
Banked
IDE-AB CF
IDE-AB CF+ESP32-C SD
IDE-AB CF+ESP32-CD SD
IDE-AB CF+ESP32-CD SD For V3 Z80 Board
Non-Banked
IDE-A CF
IDE-AB CF
IDE-AB CF+ESP32-C SD
IDE-AB CF+ESP323-CD SD
CFSYSGEN
Boot on SD Cards
Banked
IDE-AB CF
IDE-AB CF+ESP32-C SD
IDE-AB CF+ESP32-CD SD
IDE-AB CF+ESP32-CD SD For V3 Z80 Board
Non-Banked
IDE-A CF
IDE-AB CF
IDE-AB CF+ESP32-C SD
IDE-AB CF+ESP323-CD SD
SDSYSGEN
Floppy Disk Images
Where A and B are CF cards and CDEF are floppy disks. The . ZIP folders can be downloaded from sections below.
Each folder contains a completely self-sufficient set of files to build CPM3 within its own Altair.COM program.
The special folders CFSYSGEN and SDSYSGEN are for the hardware specific program to write the CPM3 boot loader on to the first few (12) sectors of the disk which we will discuss later below.
We will use as an example the building process for a single IDE/CF card CPM3 BIOS.
This is really the simplest system you can prepare. We will use the word "Drive" and "Card' interchangeably.
Here is the relevant .ZIP PC folder for this single drive setup is in the .ZIP folder IDE-A CF (3).ZIP
Epanding the .zip file gives:-

|
The important file here is the CPM3 " HMAKECPM.SUB ". It contains instructions for CPM as to how to make CPM3.SYS image file.
Its a standard CPM3 SYS file run with the SUBMIT CPM command. Let us examine the file:-

|
Run the altair.com program as shown below.
Within the CPM3 image here we already have the CPM Assembler and Linker etc. so no need to pull them in from the PC.
You should be able to recognize the CPM3 .ASM files if you read the above page describing how to build a CPM file system for a Hard Disk.
The important file is the HIDE3.ASM file that defines the disk structure. In this file there is only drive. So we have:-

|
Internally within this file is all the code to read and write sectors to this single drive.
Within CPM this function is completely self contained within this file calling only 4 functions Initilized the drive , Select the drive, Read or Write a Sector .
It should be efficient and built for speed.
The program within the above submit file that actually puts together the CPM3.SYS image file is GENCPM .
This is a program supplied by Digital Research that does all the dirty work of collecting all the components to make the CPM3.SYS file.
It uses the file GENCPM.DAT for configuration input data.
Here is an example of HMAKECPM.SUB running in the Altair CPM3 Window (Note the listing is truncated in the middle).

|
It's very important to remember that the first time you make a CPM3.SYS file with GENCPM or you add or remove hardware you must make a new GENCPM.DAT file.
You make a GENCPM.DAT file with GENCPM.COM in the Altair Box. It goes through a series of simple Yes/No questions with you.
You may also have to modify your HMAKCMP.SUB on your windows box and write it to the Altair dialog box with:-
R HMAKECPM.SUB
Next you need to transfer the new CPM3.SYS file from your PC to your S100 system. For this I like to use the free PC program TeraTerm.COM .
It can be found here (and many other places).
Here is an example:-

|
While not necessary, I first name the download XXX.SYS so if something goes wrong with the download you still have an intact CPM3.SYS file on the disk.
USBGET XXX.SYS
Once downloaded we write:-
PIP CPM3.SYS=XXX.SYS
Then boot the CF card with the Master monitor command "P" .
This should boot your new version of CPM3 an the CF card.

|
This CPM3 Image above will boot from all the following S100Computers Disk Controller boards:-
.jpg)
|

|

|
|
| IDE/CF card board (All versions) | FPGA-DC +IDE Board | FPGA_DC_IDE+FCD Board | |

|

|

|
|
| FPGA Z80 SBC | Z80 SBC | IDE-2CF+1SD Board |
Just use the Z80 Master Monitor " P " command in each case.
For the FPGA-DC boards make sure you have the IOBYTE/Dip switch in the Monitor Commands mode (Switch 7 is open) and allow enough time for the board to initialize.
WRITING THE CPM3 CF CARD LOADER FOR IDE/CF CARDS.
All the above is fine if you are using a cloned CF card with a running CPM3 system such as those listed here .
However if you want to use a new CF card or a card for a different board you need to have a CPM3 "LOADER " on that card.
The CPM LOADER is a small program that exists on the first few sectors of a CPM disk.
Its only purpose is to find the CPM3.SYS file described above on the CPM3 disk ( it can be anywhere on the disk) , load it into memory and run it.
It resides completely outside the CPM3 disk directory and list of files.
This loader program is read from the CF card (typically the first 12 sectors on the card) with code in the Z80 ROM monitor .
In our case using the Master monitor "P" command.
The LOADER program itself consists of two parts on the disk.
The first part consists of code to write the second part (see below) into RAM starting at 100H.
The second part is a primitive/partial CPM3 system to find are read into RAM the above CPM3.SYS disk file and transfer control to it.
We have two challenges. We need to write the above loader and we need to white a special program to place that loader at the starting sectors of our CF card.
This program is normally called SYSGEN.COM. It resides like any other program within the directory on a CPM3 disk.
SYSGEN.COM is very hardware specific. It has to be written specifically for each disk type and board.
It is absolutely critical you keep the tailored versions of these programs separate for each hardware disk setup.
I have the following names:-
CFSYSGEN.COM - For a CF card with a Banked or Non-Banked version of CPM3, the folder .ZIP file is CFSYSGEN.ZIP
SDSYSGEN.COM - For a SD card with a Banked Non-Banked version of CPM3, the folder .ZIP file is SDSYSGEN.ZIP
FLSYSGEN.COM - For a standard 8" Floppy with a banked or Non-Banked version of CPM3.
If you get your CPM Loader, Sysgen or CPM3.SYS files mixed up it creates unstable disk operations which fester and grow with time.
In the CFSYSGEN.ZIP folder above we will expand to the following Altair program and files:-

|
Running the CFSYSGEN.SUB file gives us the required CPM3 CFNSYSGEN.COM program which we move across to our CF card in the S100 system using USBGET.COM as described above.

|

|
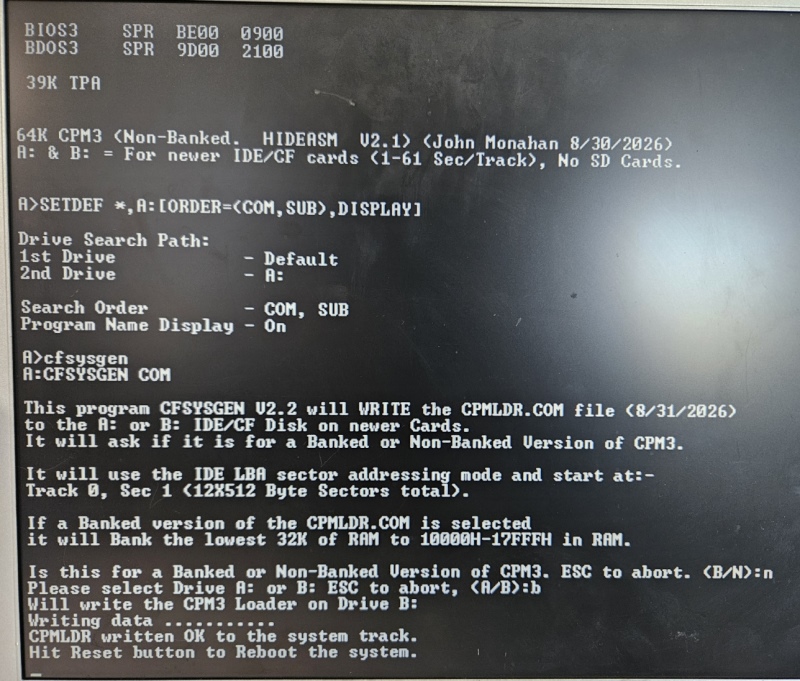
Running CFSYSGEN t hen writes the CPM3 loader on the CF Card. In this case to a Non-Banked version of CPM3 on the B: CF card.
|
Note in the past I wrote a number of SYSGEN programs called HSYSGEN to write the loader to hard disks and CF cards.
These are generally fine except they cannot be used with Floppy disks and SD cards.
Also some of the older versions wrote the loader on the current disk/card there was no disk option.
For those the want to look a little deeper I managed to combine the Banked an Non-Banked CPM3 option into one program
by "poking" a single byte flag into HLDRBIOS.ASM in RAM before its execution during its configuration.
This page was last modified on 09/11/2026